


This is the user manual of Harmonia EQ 1.1.3, released on 14 October 2026. It is written from the plug-in’s own code and texts (its hover texts, help cards, install texts, README and release notes), from its product page on arswerk.it, and from Arswerk’s own measurements and checks of the plug-in. Every number about what Harmonia does is either one of its settings or a measurement quoted from those sources. A measurement was made on test signals or recordings, so your own tracks may give other numbers: let your ears decide.
1 What Harmonia is
Harmonia EQ is an EQ plug-in for mixing. An EQ (equaliser) turns ranges of frequencies up or down: more low end, less boxiness, more air.
On one track, Harmonia is a full EQ with up to 36 bands, plus a set of tools that clean and polish one sound.
Its real idea shows when you put it on several tracks. The copies of Harmonia in your project hear each other. Each copy shares a live picture of its sound (how much energy it has at each frequency) with the other copies, up to 32 at a time; the strip at the bottom says when they cannot reach each other (see How the copies find each other). So one track can step back in the frequency bands where another one plays, with nothing to route.
1.1 What it can do
Harmonia has three families of tools.
- The EQ. 36 bands: bell, shelves, notch, tilt, band pass, all pass, and high- and low-pass filters from 6 to 48 dB per octave. Bell, shelf and tilt bands can be dynamic. Every band can work on the whole stereo sound, on the centre, on the sides, on the left or on the right. See The EQ bands.
- This track. Tools for one sound: REIN tames ringing, CLEAN trims low-mid peaks, SURFACE brings back buried detail, GLOW adds air, CHARACTER adds colour, GLUE holds the track together, and PAINT and SCULPT let you draw a curve by hand. See Polish one track.
- Tracks together. Tools that use the other copies: YIELD makes room, PUMP ducks on the kick, LEAD marks the most important track, TRACKS lists every copy, HEARD estimates how audible each track is, the STAGE places tracks left-right and near-far once you activate it, and MONO switches every Harmonia in the session to mixing for mono. See Tracks that work together.
1.2 What it does not do
Honest limits, up front.
- It only hears tracks that have a Harmonia on them, at most 32 at a time. Any other track is invisible to it.
- Nothing steps back by itself. YIELD and PUMP start at zero. You turn them up (or switch on MONO, which makes every Harmonia yield).
- One copy alone cannot hear anything. Put Harmonia on at least two tracks: YIELD, PUMP, the LEAD star and HEARD are about the tracks around this one.
- It does not mix for you. HEARD, its audibility meter, is a model that has not yet been checked against a listener: a hint, not a verdict.
- It needs a DAW (the music program you record and mix in). It runs there as a VST3, AU or CLAP plug-in.
A new Harmonia starts with every band switched off and every amount knob (CHARACTER, REIN, CLEAN, SURFACE, GLOW, GLUE, YIELD, PUMP) at zero.
2 Install and activate
Three steps: copy the files, let your DAW find them, paste your key.
2.1 What you need
- A DAW that loads VST3, AU or CLAP plug-ins.
- macOS: built for macOS 10.13 or later on Intel and macOS 11 or later on Apple Silicon, in one universal build.
- Windows: built for Windows 10 or later, 64-bit.
- Linux: x86_64 with glibc 2.35 or newer (Ubuntu 22.04, Debian 12, Mint 21 or later). To activate a bought licence code, and for the update notice and the Other products list, Linux also needs libcurl (
libcurl4on Ubuntu, Debian and Mint); a trial key works without it (see What goes online).
Not sure about your system? Try the free trial on it before you buy.
| System | Formats in the download |
|---|---|
| macOS | VST3, AU, CLAP |
| Windows (64-bit) | VST3, CLAP |
| Linux (x86_64) | VST3, CLAP |
Use the format your DAW loads: VST3 in Ableton Live, Bitwig, Reaper, Cubase, Studio One, Ardour, Qtractor and most others; AU in Logic Pro and GarageBand (macOS only); CLAP in Bitwig, Reaper and other CLAP hosts. Those names say which format a DAW takes, not that this version was tried in it.
Before a release goes out, its VST3 is run through pluginval (strictness 10) and its AU through Apple’s auval: two standard test programs for plug-ins. The CLAP is built from the same code and is not run through a validator.
2.2 Copy the files
Unzip the download. It holds one folder per format (VST3 and CLAP, and AU on macOS): copy what is inside each one (Harmonia EQ.vst3, Harmonia EQ.clap, and on macOS Harmonia EQ.component), not the folder itself, into the matching folder below. You only need the format your DAW uses; installing all of them is fine too. If a folder does not exist, create it.
| System | Format | Copy it into |
|---|---|---|
| macOS | VST3 | ~/ |
| macOS | AU | ~/ |
| macOS | CLAP | ~/ |
| Windows | VST3 | C:\ |
| Windows | CLAP | C:\ |
| Linux | VST3 | ~/.vst3 |
| Linux | CLAP | ~/.clap |
On macOS, the ~/Library folder is hidden. In Finder press Cmd+Shift+G and paste the path, or hold Option while you open Finder’s Go menu.
On Windows, Harmonia EQ.vst3 is a folder, not a single file. Copy the whole folder, exactly as it comes out of the zip, and do not drag out the file inside it. Some unzip tools flatten the folder: if in doubt, extract with Windows Explorer’s own Extract All. Windows may ask for administrator permission, which is normal for these folders. The VST3 folder is not your old VSTPlugins (VST2) folder.
On Linux, from a terminal, with the zip extracted next to you:
mkdir -p ~/.vst3 ~/.clap
cp -r "VST3/Harmonia EQ.vst3" ~/.vst3/
cp -r "CLAP/Harmonia EQ.clap" ~/.clap/
2.3 Let your DAW find it
Most DAWs look for new plug-ins only when they start. Quit and reopen yours, or start a rescan:
| DAW | Rescan |
|---|---|
| Ableton Live (macOS) | Live > Settings > Plug-Ins > Rescan (Live 11: Live > Preferences > Plug-Ins > Rescan) |
| Ableton Live (Windows) | Options > Settings > Plug-Ins > Rescan (Live 11: Options > Preferences > Plug-Ins > Rescan) |
| Bitwig Studio | Dashboard > Settings > Locations > Plug-in Locations |
| Logic Pro | reopens and validates Audio Units automatically |
| Reaper | Preferences > Plug-ins > VST > Re-scan (Windows and Linux: Options > Preferences > Plug-ins > VST > Re-scan) |
| Cubase (Windows) | Studio > VST Plug-in Manager > Rescan All (Cubase 15: “Scan for new and blocked plug-ins”) |
| FL Studio (Windows) | Options > Manage plug-ins > Find installed plug-ins, then mark Harmonia EQ as a favourite: see FL Studio |
| Ardour (Linux) | Window > Plugin Manager > Discover New/Updated |
2.4 Activate
- Open Harmonia on a track. It opens on its key panel. Until a key is activated it passes the sound through unprocessed.
- Open the Arswerk email that brought you the download. Your key is in it: a long code that starts with
ARSWERKV1. - Copy the whole code, paste it into the key panel and press
ACTIVATE. A trial key answers with the days left, for example “Trial activated - 7 days left”.
Not now closes the panel. Without a key, Harmonia then passes the sound through unprocessed until one is activated.
No key yet? On arswerk.it/en/vst/harmonia type your email and press “Start my free 7-day trial”: no card, no password. One email brings the download and the key, and we make a free Arswerk account for that address if you have none. One trial per email address and per computer.
Lost that email? Sign in at arswerk.it/en/account (“Email me a sign-in link” needs no password) and press “Email me my codes again”.
How the trial and the licence work, and what Harmonia sends over the internet: Trial, licence and what goes online.
3 Quick start
Three moves to try, and a fourth for a single track. The first three need Harmonia on at least two tracks: the copies react to each other, and one copy alone has nothing to react to.
3.1 Set up
- Put Harmonia on your main tracks: for example kick, bass, vocal and music. They find each other on their own, with no routing. Leave your mix bus out for now: see A Harmonia on the mix bus.
- Name each one. Click the name box at the bottom left of its window and type KICK, BASS, VOX… (up to 20 characters). The other copies show that name. While the box still holds a default name, Harmonia may take the track name your DAW sends.
- Look at the strip along the bottom of the window. The other Harmonias appear there as chips: small tiles with their names (when more are in the session than fit, a +N box counts the rest and opens the full list). If the strip says “Add Harmonia to another track”, this copy is alone so far.
3.2 Make room for the kick
YIELD lets a track step back, band by band, where other tracks play. Here the bass makes room for the kick.
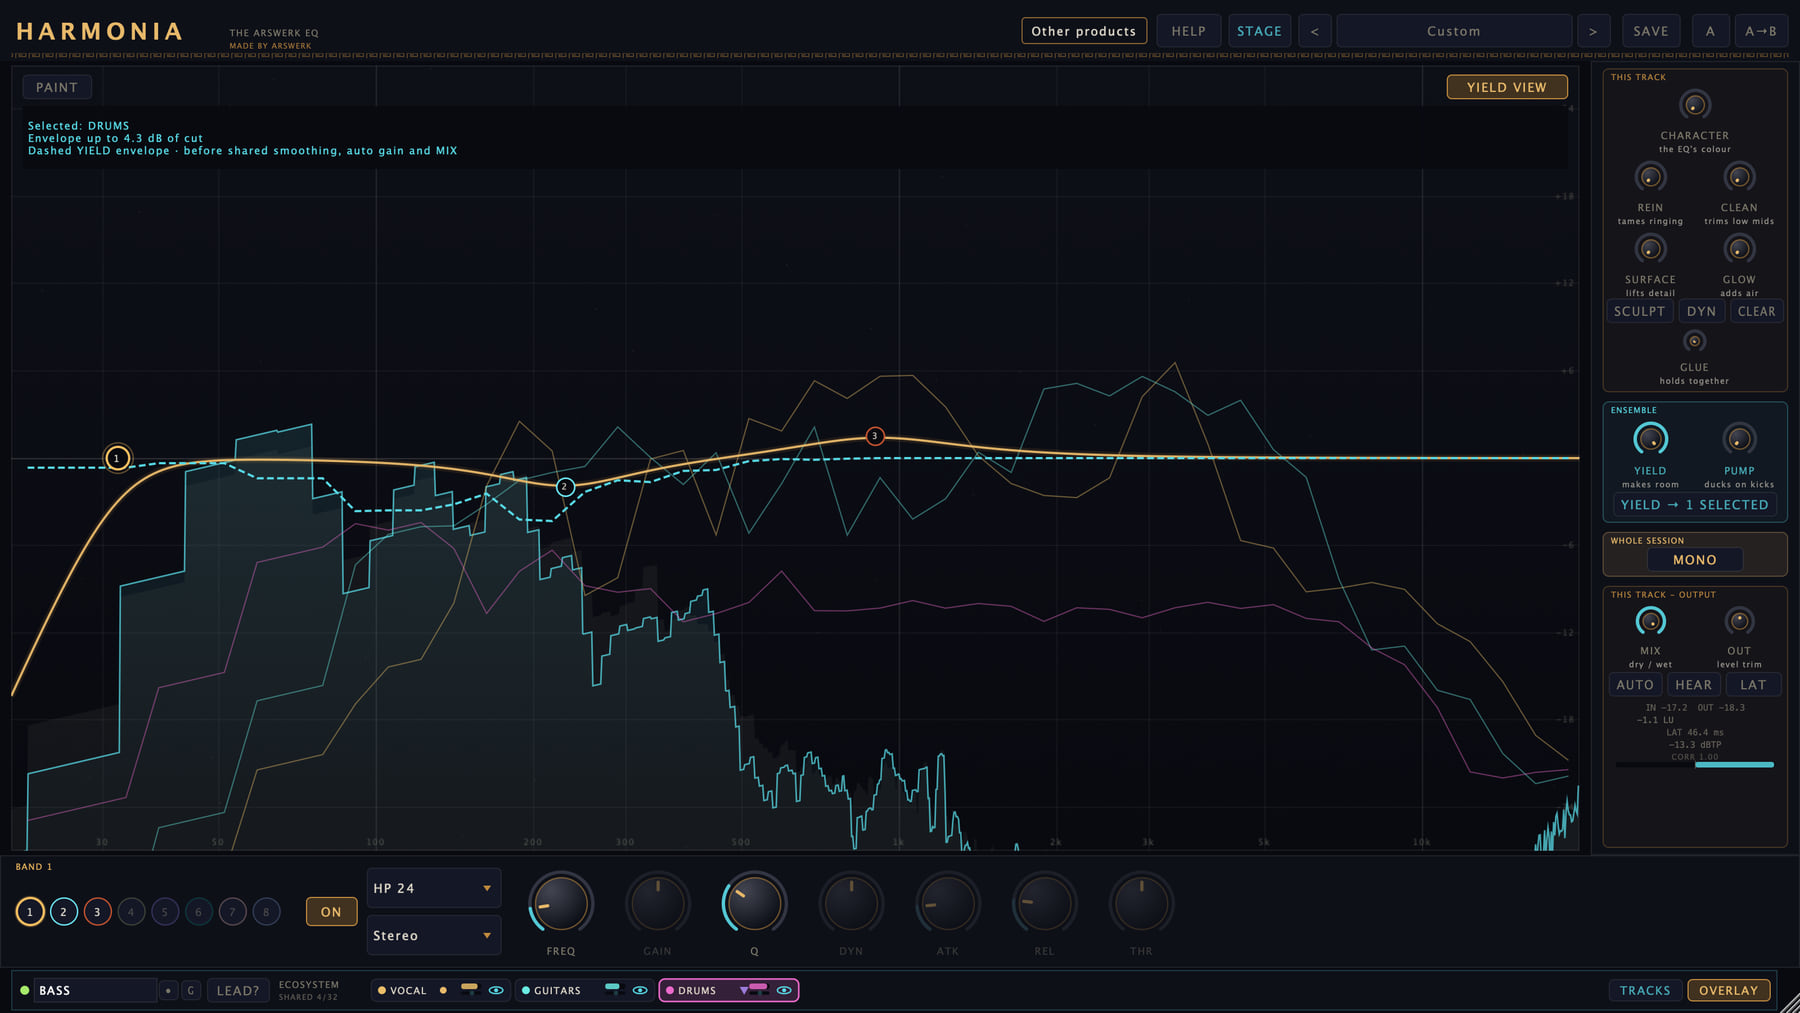
YIELD → 1 SELECTED. YIELD VIEW is on: the dashed line is YIELD’s cut, and the lines at the top say who it yields to and how deep it cuts.- Open the Harmonia on the bass.
- Turn up
YIELD, on the right of the window in the ENSEMBLE zone. Start at about 50 %. - Read the button under the knob: it says who the bass makes room for. A new Harmonia makes room for every other Harmonia, so with only the kick besides the bass it reads
YIELD → ALL (1). If more tracks have a Harmonia, click the kick’s chip in the bottom strip: now the bass makes room for the kick only, and the button readsYIELD → 1 SELECTED. - Play a part where kick and bass sound together, and compare YIELD at 0 with your setting. First click
LATon the bass (in the OUTPUT zone at the bottom of the rail, beside HEAR): without it, the bass drops out or clicks for a moment each time YIELD leaves 0 or goes back to it, because Harmonia’s delay changes (see When Harmonia adds latency). To see the cut, clickYIELD VIEWat the top right of the display: the dashed curve is YIELD’s cut.
What to expect. The bass is cut only in the frequency bands where the kick has energy. How deep depends on how loud the kick is against the bass in each band: where the kick is louder, the cut is deeper; where it is quieter, YIELD cuts little. The cut is not a dip on each hit. YIELD follows the kick’s energy with some smoothing: on a steady beat the bass stays partly down while the kick keeps playing (least right at a hit, most a tenth to a quarter of a second after it), and it comes back within about a second after the kick stops. For a dip on every hit, use PUMP (the next recipe). For a clearer cut, go towards 70–100 %.
More: YIELD and YIELD VIEW.
3.3 Duck a pad on the kick
Ducking means turning a sound down for a moment. PUMP ducks a track when a key track hits, like a sidechain compressor, with nothing to route. It works on a pad, a bass, a synth.
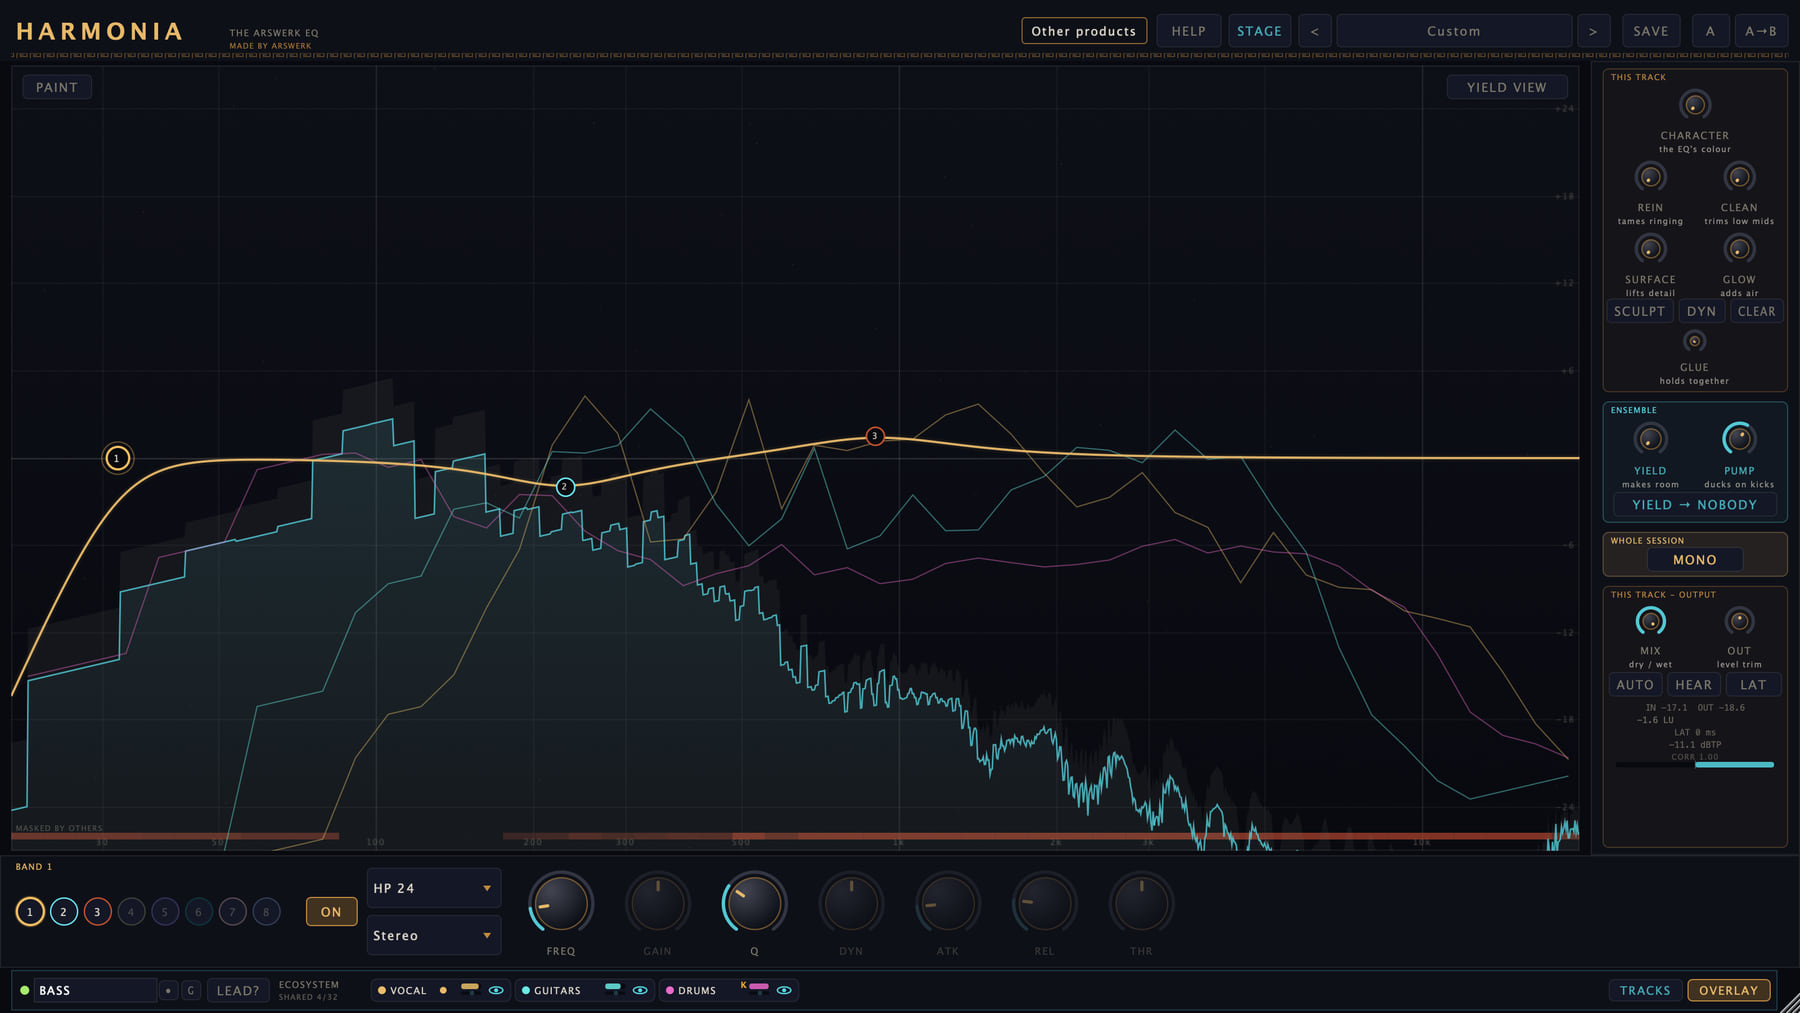
- Make sure the kick has its own Harmonia. PUMP needs it: on its own, a Harmonia has nothing to react to.
- Open the Harmonia on the pad. Right-click the kick’s chip in the bottom strip and choose
Pump from (sidechain key). From then on only the tracks you chose trigger PUMP, and PUMP jumps to 40 % if it was below 5 %. - Set
PUMP: 20–40 % for a groove you feel more than hear, 60–100 % for the obvious pump. - Play. If your kick sits in a drum bus, put Harmonia on that bus and choose the bus’s chip as the key; PUMP then ducks on the other drum hits too, the snare as much as the kick.
Why choose the key yourself. By default PUMP listens to every other Harmonia with plenty of low end (at least 30 % of its energy below about 150 Hz, as Harmonia measures it): the kick, but often a bass too, and at times other tracks, such as guitars. A held buzzy sound, such as a saw bass, keeps the duck down for as long as it plays.
More: PUMP.
3.4 Let a vocal sit over the music
This one is subtle, and that is the honest truth about it: on a full mix the change is small. It shows the idea.
- Put one Harmonia on your vocal and one on your music bus (or one on each music track: then do step 3 on each of them).
- On the vocal’s Harmonia, press
LEAD?at the bottom left to give it the star. The button now readsLEAD. - On the music’s Harmonia, click the vocal’s chip in the bottom strip. If YIELD was below 5 %, the click sets it to 50 %; turn it further up if you like.
- While the vocal sings, the music steps back in the vocal’s bands only, and it comes back over about half a second after the vocal stops. To hear it, compare YIELD at 0 with your setting, or use A/B; click
LATon the music first, so that the comparison does not click.
YIELD does nothing at 0 (unless the session’s MONO is on), and nothing without that second Harmonia.
3.5 Only one track? Try SURFACE
Some tools need no other Harmonia. Put Harmonia on your vocal and turn SURFACE up to about 40 %: buried detail is lifted and the vocal comes up by about 3 dB, most of it above 1 kHz.
Because the vocal also gets louder, switch on AUTO (in the OUTPUT zone, under MIX and OUT) before you judge it: you then compare tone, not level. To compare SURFACE at 0 with your setting, click LAT first, as for YIELD: without it the vocal drops out or clicks for a moment each time SURFACE leaves 0 or goes back to it. More: SURFACE.
4 A tour of the window
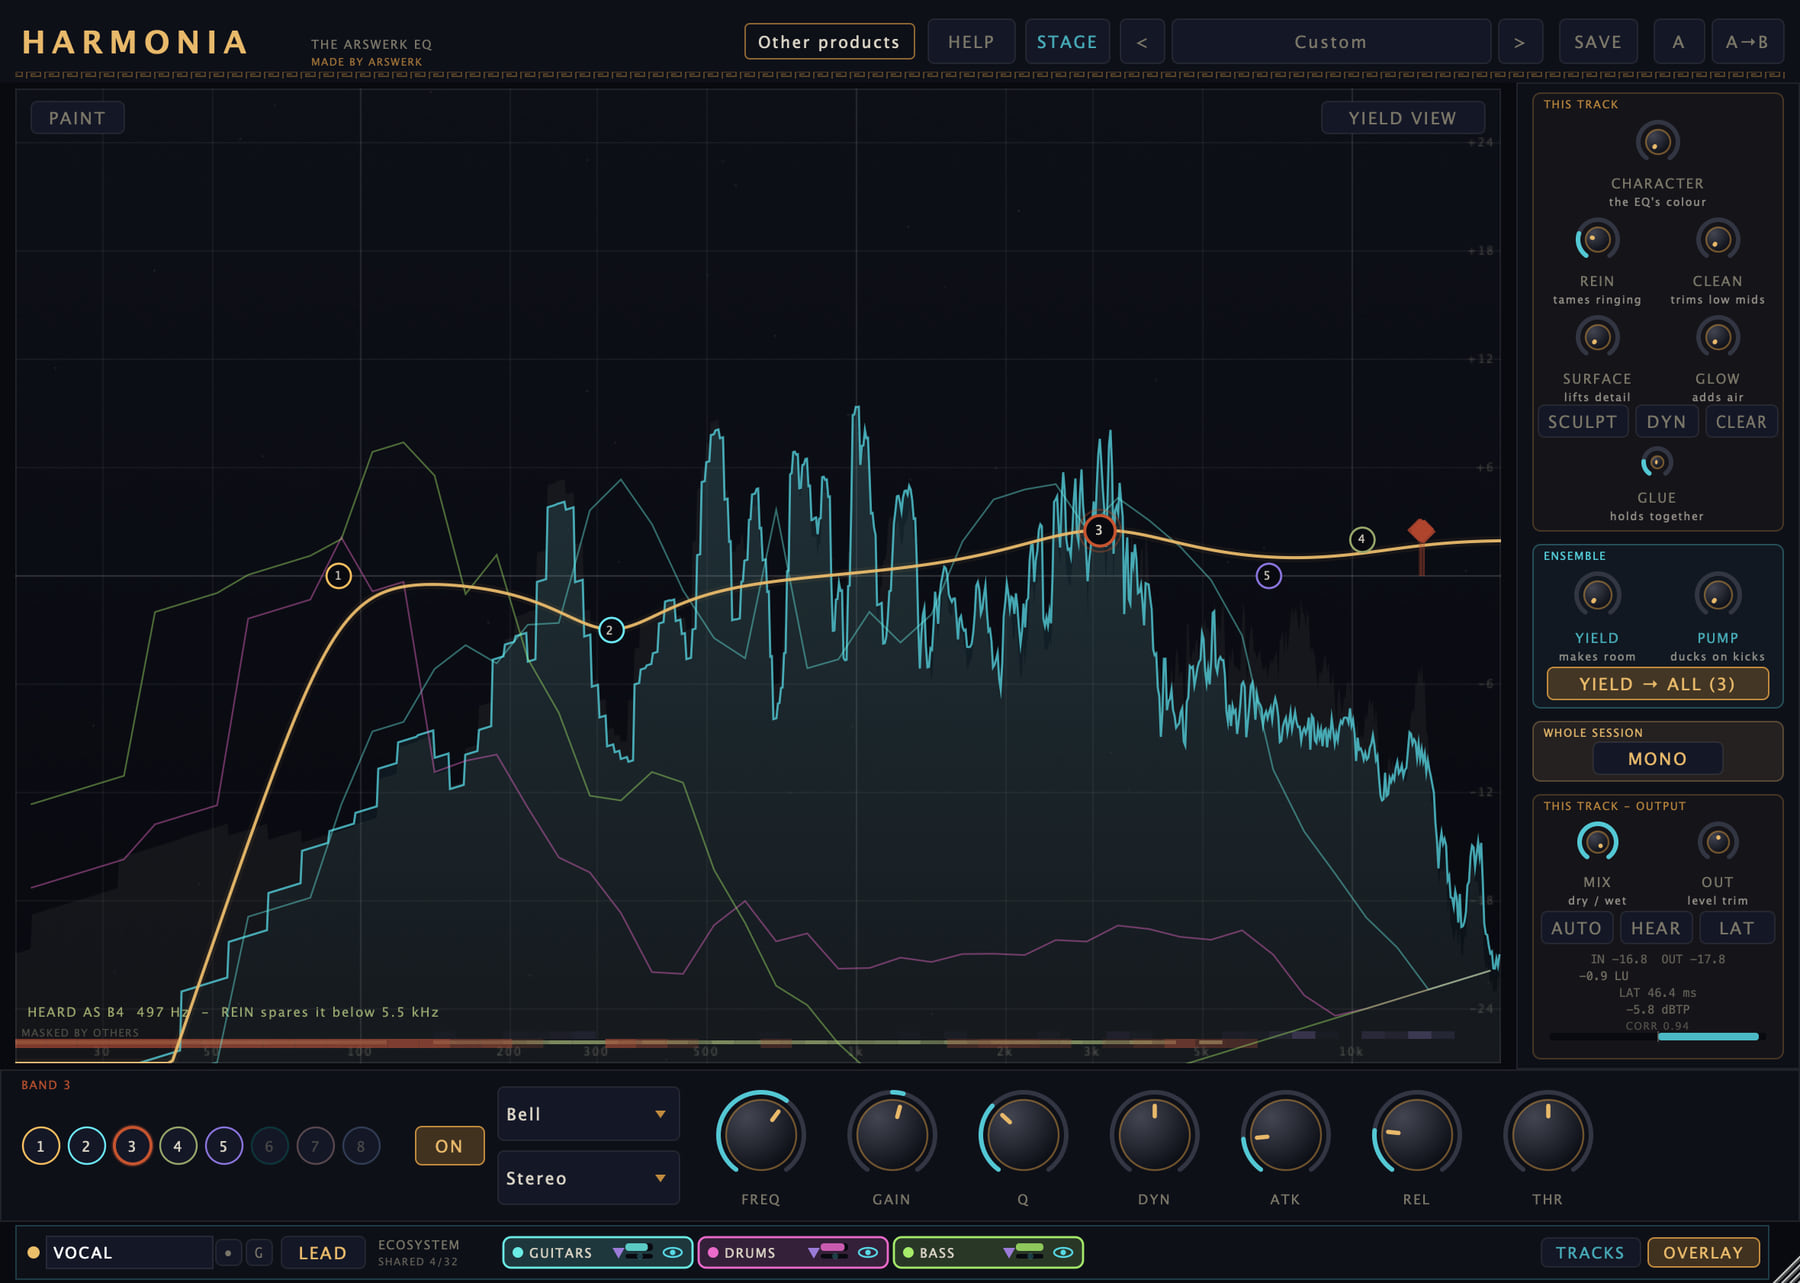
4.1 The six areas
- The top bar. The HARMONIA wordmark, then on the right:
Other products,HELP,STAGE, the preset box between<and>,SAVE,A(A/B) andA→B(copy). See Presets, A/B and undo. - Strips above the top bar, sometimes. The trial strip while there is no bought licence on the computer: it says how to start the trial, how long it has left, or that it has ended, with a Buy button and an Activate button (which reads
I bought itonce the trial has ended). And the update notice, when a newer version exists. - The display. The spectrum of the sound and your EQ curve.
PAINTsits at its top left,YIELD VIEWat its top right. See The display. - The band strip. Under the display: the band numbers,
ON, the type and placement boxes, and the knobs FREQ, GAIN, Q, DYN, ATK, REL and THR of the selected band. See The EQ bands. - The rail. On the right, in four zones: THIS TRACK (CHARACTER, REIN, CLEAN, SURFACE, GLOW, SCULPT, GLUE), ENSEMBLE (YIELD, PUMP, and the button that says who YIELD makes room for), WHOLE SESSION (MONO) and THIS TRACK - OUTPUT (MIX, OUT, AUTO, HEAR, LAT and the meters).
- The ecosystem strip. Along the bottom: this track’s name, colour, group and LEAD button, then the other Harmonias as chips, then
TRACKSandOVERLAY. See The ecosystem strip.
Some views open over the window: the STAGE, TRACKS, the HELP cards, the key panel and the Other products list. The STAGE and TRACKS close with their CLOSE button, the HELP cards with Close (Got it on the first card) or HELP again, the key panel with Not now. The Other products list closes when you click outside it, click its button again or press Esc.
4.2 Three habits
- Hover. Almost every knob and button explains itself: rest the mouse on it and read its hover text.
- Right-click. Almost everything has more options: filter types, dynamics presets, targeting, settings.
- Look at the bottom strip. It shows the other Harmonias in the session. They hear each other.
4.3 Knobs and the window
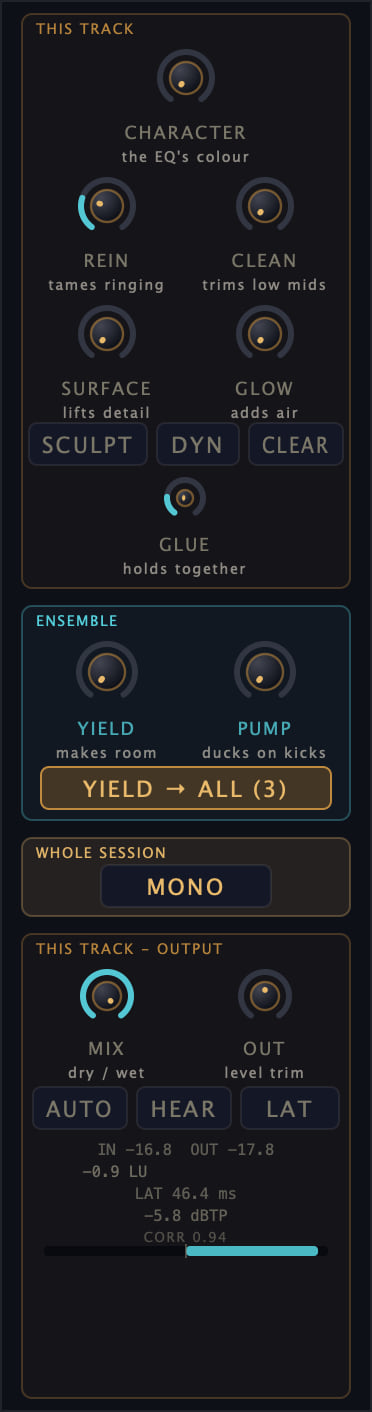
- Turn a knob by dragging up and down (or sideways). Hold Cmd (Ctrl on Windows and Linux) for fine control.
- Double-click a knob to put it back to its default.
- Type a value: double-click the name strip under the knob, type (for example
1.2k,1200 Hz,-3 dBor50 %) and press Return. - Right-click CHARACTER, REIN, CLEAN, SURFACE, GLOW, PUMP or OUT, or the band’s DYN knob, for their settings. In the CLAP, every rail knob also offers MIDI learn there (see MIDI learn).
- Read the hint. Under each rail knob’s name, when the window is tall enough, a few words say what it does: “the EQ’s colour”, “tames ringing”, “trims low mids”, “lifts detail”, “adds air”, “holds together”, “makes room”, “ducks on kicks”, “dry / wet”, “level trim”.
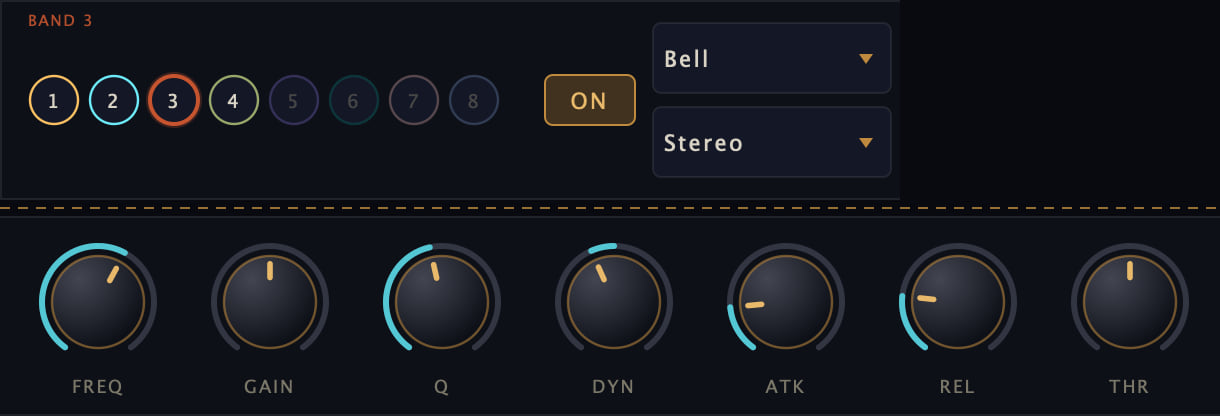
- Dimmed knobs. On a band type that has no gain (Notch, high-pass, low-pass, Band Pass, All Pass), GAIN, DYN, ATK, REL and THR are dimmed: they have nothing to move.
- The window can be resized by dragging its bottom-right corner. The size you choose is saved with the project. When the window opens, Harmonia fits it to your screen; on a small screen the whole window may be drawn smaller.
5 The EQ bands
Harmonia has 36 bands. A band is one filter: it turns a range of frequencies up or down. A new Harmonia has every band switched off. The band strip shows eight numbers to begin with; past band 8 it shows every number up to the highest band in use, plus one spare.
5.1 Add, move and remove bands
- Add. Drag on an empty spot of the display: a band appears there and follows the mouse, so you place and shape it in one move. A double-click on an empty spot also adds one. A band made this way is a plain Bell band, on both channels, with no dynamics.
- Move. Drag a node (the numbered dot): sideways for frequency, up and down for gain (up to 24 dB either way). Hold Cmd or Ctrl for fine moves.
- Width. Turn the mouse wheel over a node to change its Q, its width.
- Select. Click a node, or press 1 to 9 for bands 1 to 9. The band strip then shows that band. If several nodes sit on one spot, click again to reach the next one.
- Switch off and on. Click the band’s number in the band strip. A band switched back on comes back where you left it. Alt-click a node, press Delete, or choose Delete Band in its menu: the band switches off and keeps its settings.
- All 36 in use? A drag or a double-click on the display then shows “ALL 36 BANDS ARE IN USE”. Switch one off to add another.
- Read the display. Rest the mouse on the display to see the note, the frequency and the cents under the pointer.
In the band strip, the knobs FREQ, GAIN and Q do the same as dragging, for the selected band. ON switches the selected band in or out; a band that is off keeps its settings.
5.2 Band types
Choose the type in the type box of the band strip, or in the node’s right-click menu.
| Type | What it does |
|---|---|
| Bell | Boosts or cuts around a centre frequency. The workhorse. |
| Low Shelf, High Shelf | Raise or lower everything below (or above) the corner. Push Q past 0.7 for a resonant lip at the corner, in an analogue style. |
| Notch | A surgical cut at one frequency. |
| Tilt | Tips the whole balance. Positive gain brightens: half of it as a cut below the frequency and half as a boost above, crossing 0 dB at the frequency. It is two shelves: Q above 0.7 adds their lip on each side. |
| Band Pass | Keeps only a band around the frequency, 0 dB at its peak. Q sets how narrow. |
| All Pass | Shifts phase around the frequency without changing the level of what it is placed on. Q sets how quickly the phase turns around the frequency (the higher the Q, the more quickly). Placed on Mid or Side it can move a sound between left and right. In linear phase it does nothing. |
| HP, LP (6, 12, 24, 36, 48) | Remove lows (high-pass, HP) or highs (low-pass, LP), at 6 to 48 dB per octave. The higher the number, the steeper the slope. |
Q on the high- and low-pass filters. On the 12 to 48 dB slopes, Q shapes the corner. A new band starts at Q 1.00, which already makes a bump at the corner, bigger the steeper the slope: about +1 dB at 12 dB per octave, +4 at 24, +7 at 36, +10 at 48. For a clean high-pass with no bump, set Q to 0.71. The 6 dB slopes have no bump.
5.3 Centre, sides, left or right
The placement box, under the type box, chooses where a band works.
Stereo: both channels, the whole sound.Mid: the centre of the image only, what is the same in both speakers (often vocal, kick, snare, bass).Side: the stereo edges only, what differs between left and right (width, air, room, cymbals).Left,Right: one channel only.
Example: with CHARACTER at zero, a High Shelf on Side adds sparkle without touching a lead vocal that sits exactly in the centre.
The display can show the Side, Left or Right channel too: right-click an empty spot of the display and choose under Channel (The display menu).
5.4 Make a band react to the music
A dynamic band moves by itself when the sound changes. Use it to soften the start of an ess, of a harsh consonant or of a boomy note, not its whole length.
- Choose a Bell, shelf or Tilt band. The other types have no gain to move.
- Turn
DYNbelow zero: the band pulls down, by up to that many dB, when the energy at its frequency jumps above its own recent average. Turn it above zero: it lifts for the same short moment instead. At zero the band is an ordinary static band. - Quicker: right-click the node and choose under Dynamic: Duck −3 dB, Duck −6 dB, Duck −12 dB, Lift +3 dB or Lift +6 dB.
The node’s halo pulses while the band is moving.
It is a move, not a hold. The band acts at the start of a rise and lets go by itself even if the energy stays up: with the default ATK and THR, after about 0.12 s.
The three timing knobs (they only act while DYN is not zero). The defaults suit most sounds; change them when you need to:
ATK, attack: how fast the band reacts once energy flares inside a sound that was already there. Short catches the transient, longer lets more of it through, and from about 50 ms up the band no longer reaches its full DYN. After about a second of silence the first sound is caught at once, at any setting.REL, release: how slowly the band’s detector lets go. The band itself is back within about a tenth of a second at any setting. A long release mostly makes the band ignore the flares that follow: at 1000 ms, a second hit 0.4 s after the first is not touched.THR, threshold: how far above the band’s own running average the energy must rise. It is not an absolute level, so it keeps working when you change the fader or the take. Above zero is less sensitive, below zero more. Below about −3 dB the band stays partly moved even on a steady sound, and from about −12 dB (with the default knee) it sits at its full DYN all the time. 0 is the automatic behaviour.
In the node’s menu: Detector, Peak (it reacts to the loudest instants) or RMS (it reacts to the energy), and Knee: Hard (3 dB), Medium (9 dB, the default) or Soft (18 dB): how far the energy must rise past the threshold to take the band from no move to its full move.
The DYN menu. Right-click the DYN knob for three settings that apply to every dynamic band of this Harmonia:
- Dynamics key:
This track(the default) orSidechain input, the sidechain your DAW sends into Harmonia. How to send one depends on your DAW. When the DAW sends no sidechain, the row says so and the track keys itself; when a sidechain is connected but carries nothing, the row says “(nothing arriving)”. - Dynamic lookahead: Off, 2, 5 or 10 ms: the dynamic bands react that much earlier; they then listen to the sound before the spectral layers have worked on it. It works only while the analysis window is in the audio path (a spectral layer, linear phase or LAT is on: see Latency); otherwise the menu says so.
- Hold through transients: when Harmonia detects a hit, the gain of the dynamic bands is frozen for 15 ms before they shape the rest of the sound. Not every hit is detected.
In linear phase, a dynamic move begins about 10 ms before the sound and is complete about 16 ms into it.
5.5 Listen to one band
Right-click a node and choose Listen to this band. You hear only the part of the track around that band’s frequency, taken before any processing (the higher the band’s Q, the narrower that part; the same whatever the band’s type), and a red banner reads LISTENING TO BAND followed by the band and its frequency. Right-click the node again and choose Stop listening to go back.
5.6 The node menu
Right-click a node for everything about that band. Rows that cannot act are greyed: those that need a gain, on a type that has none, and the two that add a band, when all 36 are in use; Paste band stays grey until you have copied a band.
- Type and Placement: as in the band strip.
- Dynamic: Off, Duck −3, −6 or −12 dB, Lift +3 or +6 dB (Bell, Shelf and Tilt bands only).
- Detector (Peak, RMS) and Knee (Hard, Medium, Soft): see Make a band react to the music.
- Proportional Q: Off, Half or Full. On Bell and shelf bands, the band gets wider as its gain grows (up to 12 dB of gain), so small moves stay close to the width you set.
- Copy band and Paste band: copy one band’s settings onto another.
- Duplicate to a free band: a copy on the first band that is off.
- Add a copy with the opposite gain (same frequency).
- Invert gain: a boost becomes the same cut, and back.
- Listen to this band or Stop listening: see Listen to one band.
- Reset Gain: back to 0 dB. Delete Band: switches the band off and keeps its settings.
5.7 Keyboard shortcuts
| Key | What it does |
|---|---|
| 1 to 9 | Select band 1 to 9. |
| [ and ] | Select the previous or the next band that is on. |
| ← → | Move the selected band down or up by a semitone (with Cmd/Ctrl: a tenth of a semitone). |
| ↑ ↓ | Raise or lower its gain by half a dB (with Cmd/Ctrl: a tenth of a dB). |
| Delete or Backspace | Switch the selected band off. |
| H | Move the selected band onto the nearest harmonic of the note REIN’s detector hears. The detector listens only while REIN or CLEAN is turned up; when it finds no note, nothing happens. |
| Esc | Leave PAINT; close the Other products list. |
| Cmd+Z | Undo (Ctrl+Z on Windows and Linux). One press can take back more than one move: see Undo. |
| Shift+Cmd+Z or Cmd+Y | Redo (Ctrl on Windows and Linux). |
Keys reach Harmonia while its window has the keyboard focus: click in it first. Your DAW may keep some keys for its own shortcuts.
6 Polish one track
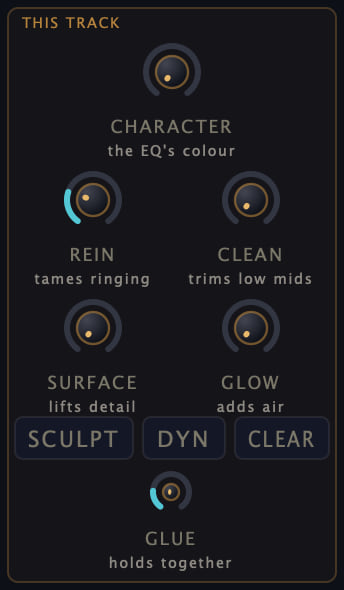
The THIS TRACK zone at the top of the rail holds tools that work on this track. They need no other Harmonia.
REIN, CLEAN, SURFACE, GLOW and SCULPT are spectral layers: they work in Harmonia’s spectral engine, which looks at the sound in many narrow frequency slices. While one of them is on, Harmonia delays the track by about 43–46 ms at the usual sample rates (one “analysis window”) and reports that delay to your DAW. Two exceptions: REIN alone in its zero-latency mode adds no delay, and TRACKING takes the delay out: it holds CLEAN, SURFACE, GLOW and SCULPT down (their knobs keep their settings) and runs REIN in its zero-latency mode (see Latency).
6.1 Tame ringing: REIN
For: narrow peaks that ring out of a sound, for example a ringing drum or a whistling resonance in a guitar recording.
Try: 10–20 %. A clean ringing tone above about 1 kHz then comes down about 4–9 dB, less in the low mids, and what surrounds it is not cut. Past 35 % the cut reaches 15–25 dB: keep that for sources that are really harsh.
How it works: REIN compares each frequency with the track’s own local average and pulls down the narrow peaks that stand out, while they ring. When they stop, it lets go: at the default Release the cut has eased off after about a third to half a second. A resonance that comes back after a pause is caught about a quarter of a second in. It does not flatten a broad hump: use a band for that.
What you see: red diamonds on the display mark REIN’s six deepest cuts, whatever caused them. Hover one to read how deep REIN’s narrow cut is there; at high settings the whole cut can be up to 8 dB deeper than that number.
Notes are protected, within limits. REIN recognises a held note with several harmonics between about 100 Hz and 1.3 kHz, and largely spares its harmonics up to about 5.5 kHz. The line HEARD AS at the bottom of the display names the note it recognised (on low notes it can be an octave out), and small olive marks show the frequencies it spares. Everything else that rings is treated as a resonance, so keep REIN low on:
- bright sustained notes: their harmonics above about 5.5 kHz are not spared (at 20 % a bright sustained note loses about 10 dB of its top, a real vocal or synth 1–4 dB);
- notes above about 1.3 kHz;
- pure tones, and notes with only two or three harmonics;
- bass notes below about 100 Hz (spared only in part).
6.2 Trim low-mid peaks: CLEAN
For: boxiness, boominess and mud, between 120 and 700 Hz.
Try: up to about 25 %. By 25 % the knob has done nearly all it can; above that only a single isolated peak is cut deeper (up to about 10 dB).
How it works: CLEAN finds the narrow peaks that stick out of the track’s own spectrum in that range and pulls them down while they last: about 3–6 dB on a steady narrow peak at 25 %, and about 0.2 to 3 dB off the whole region on a full track. It does not flatten a broad build-up (an 8 dB hump comes down by less than 1 dB): use a band for that.
6.3 The REIN and CLEAN menu
Right-click REIN or CLEAN: both open the same menu.
- Focus range (REIN + CLEAN): where the two may act. Full range (the default), Low mids 120 Hz - 700 Hz, Presence 2 kHz - 8 kHz, Highs 4 kHz - 16 kHz, or Above 1 kHz.
- Brickwall: two very steep filters: a high-pass at 40, 80 or 160 Hz and a low-pass at 16, 12 or 8 kHz (
HP offandLP offswitch them off). At the corner a wall is already 1–10 dB down, and about 70 Hz further on 50 dB or more. Just inside the range it keeps it is not perfectly clean: some 50–80 Hz from the corner, noise loses about 5 dB and a steady tone up to 9 dB (under 1 dB from 200 Hz away). The walls cost one analysis window of latency in all, nothing more if a layer already has the window in the path. HP 40 Hz has little below it to remove. - Release (REIN + CLEAN): how fast the cuts let go: 40 ms (snappy), 80, 130 (the default), 300 or 700 ms (slow). The number sets the speed, not the whole time: at the default 130, a cut has eased off about a third to half a second after the ringing stops.
- Zero-latency REIN (time-domain notches): REIN’s cuts are made by six notch filters instead of the spectral engine, so REIN adds no delay. It does not react sooner, and its cut is usually shallower and less even (on steady tones from 1 to 9 kHz, 3–8 dB against 8–11 dB with the window, at REIN 20 %). Worth it while recording; leave it off when mixing, where latency is free and depth is not.
6.4 Bring back buried detail: SURFACE
For: detail that the track’s own louder parts are covering.
A loud sound makes quieter sounds near it in frequency harder to hear. This is called masking. SURFACE uses a model of hearing to find the parts of this track that its own louder parts are masking, and lifts them back toward audibility.
Try: 20–40 %. Buried detail comes up about 2–3 dB. Past 40 % only the most buried parts get more (about 1–2 dB more at full).
Good to know:
- By default the whole track gets louder with it, by up to about 3 dB. To keep the level, right-click SURFACE and choose Level neutral, or switch on AUTO.
- It also knows where other Harmonia tracks are burying this one, and lifts a little more there (about 1 dB).
- Breaths and room come up with the track at every setting.
The SURFACE menu (right-click):
- Spectral lift: Normal or Level neutral. Level neutral holds the track’s level (within about 0.3 dB in the measurements) while the buried parts still come up against the rest. It applies to the whole spectral lift, GLOW’s included.
- Monitoring level (masking spread): Quiet - masking stays local, Normal, or Loud - masking reaches further. It tells the model how loud you listen.
6.5 Add air: GLOW
For: air and presence that follow the source, not a fixed shelf: a tilt above 1.5 kHz, stronger the duller the sound is.
Try: 15–30 %. On an already harsh source, use less.
How it works: GLOW measures how dull the sound is, comparing its energy between 150 Hz and 2 kHz with its energy between 5 and 14 kHz. A fully dull sound gets the whole lift: about +1 to +1.5 dB at 15 %, +2 to +3 dB at 30 %, and close to +6 dB at full, which is the limit. A sound that counts as bright (white and pink noise do) gets much less: up to about +0.5 dB at 15 %, +1 dB at 30 %, +3 dB at full.
Good to know: GLOW skips whatever is far below the loudest part of the sound at that moment, so hiss about 60 dB or more under the music is left alone. In a pause, though, the hiss is the loudest thing left, and it comes up too. What sounds bright is not always bright by GLOW’s measure: a raw sawtooth at 110 or 220 Hz gets most of the full lift.
The GLOW menu (right-click): Normal (keeps a floor on bright sources) or Strict (no floor on bright sources). In Strict, a sound that counts as bright gets nothing.
6.6 Add colour: CHARACTER
For: the EQ’s personality, from clean to console saturation to vintage bloom.
- PURE (knob all the way down): exactly what you dialled.
- CONSOLE: an analogue-console feel. Boosts widen musically, and the whole track is saturated with odd harmonics, with or without boosts: lightly at the start of the knob, strongly by CONSOLE itself, where it also takes several dB off the peaks. Boosted bands push it harder.
- VELVET: vintage bloom. Wider still, with richer, slightly asymmetric harmonics.
Reading the knob: the readout shows how far it is on the way to the next name. “CONSOLE 25 %” is a quarter of the way from PURE to CONSOLE. It reads PURE only with the knob fully down. To type a value, enter a number from 0 to 2 (0 = PURE, 1 = CONSOLE, 2 = VELVET), or one of the three names.
The CHARACTER menu (right-click): Drive tilt (tone, not a circuit). Lows hardest, Lows, Even (the default), Highs or Highs hardest: which part of the spectrum is driven hardest.
Good to know: CHARACTER saturates the whole track, so it also changes level and peaks: with CHARACTER up, a +12 dB band boost lowers the whole track by 1.2 to 2.5 dB. Start low and compare with A/B. While CHARACTER is above zero, it also delays the sound by about 4 samples (0.08 ms at 48 kHz), and that tiny delay is not reported to your DAW.
6.7 Hold the track together: GLUE
For: gentle compression in one knob, the sound of a track holding itself together. Not a limiter, not a pump.
Try: 20–30 % for cohesion. At full it compresses by up to about 5 dB.
How it works: slow, gentle RMS compression with an automatic threshold (it learns the track’s own level, so there is no threshold knob) and a release that breathes in musical time with your DAW’s tempo.
6.8 Draw your own curve: PAINT and SCULPT
For: shaping the sound with a freehand curve: broad, gentle moves, or a shape that bands would make awkward.
- Click
PAINTat the top left of the display. The pointer becomes a brush. - Drag: above the centre line lifts, below it cuts, and near the line the curve snaps flat. You can paint from 12 dB up to 18 dB down. The hint line under the buttons lists the keys: Shift for a flat line, Cmd/Ctrl for fine, right-drag or Alt-drag to erase, the mouse wheel for the brush size.
- Release: the stroke you just made is smoothed.
- Click PAINT again, press Esc, or select a band to go back to band editing. The curve stays.
The painted curve is violet: 256 points across the spectrum, about 26 per octave.
The SCULPT, DYN and CLEAR buttons (rail). (This DYN is SCULPT’s own, the same as the DYN beside PAINT; it is not the band strip’s DYN knob.) SCULPT puts the painted curve in or out of the sound; the curve is kept either way (dim violet means present but bypassed), and painting switches it on. DYN makes painted moves follow the level: a move is applied in full while the sound there is rising above its recent average, and relaxes when it falls back. On a steady sound most of the move stays: a 12 dB cut is about 9.6 dB on a steady tone. CLEAR wipes the curve back to flat.
Good to know: the sound follows the curve in steps of about 23 Hz, so down low it cannot follow fine detail. A stroke made with the smallest brush gives about half its depth around 300 Hz, and below about 110 Hz it can do nothing at all. Broad strokes come out close to what you drew from about 60 Hz up. A factory preset clears the curve.
The SCULPT menu (right-click SCULPT):
- Learn what the spectral layers are doing, then Stop learning and freeze the curve: while it learns, Harmonia averages what its spectral engine actually does to this track; when you stop, that average becomes the painted curve, which you can see and edit. The layers keep working as before: to hear the frozen curve in their place, turn them down and switch
SCULPTon. - Match a reference: the three steps below.
- Undo stroke, Smooth a little, Smooth more.
- Copy curve and Paste curve, through the clipboard: for example from one Harmonia to another.
- Clear.
Match a reference (SCULPT’s menu):
- Play a reference through this Harmonia (for example on the same track) and choose
Capture the reference; chooseStop capturing the referencewhen it has played. - Play your track and do the same with
Capture this track. - Choose
Propose the difference as a curve: Harmonia writes the difference between the two average spectra into the painted curve, smoothed and without the overall level difference. You hear it whileSCULPTis on.
While it captures, the analysis window is in the audio path, as for a spectral layer (see LAT).
7 Tracks that work together
This is what makes Harmonia different. Each copy shares its spectrum with the others, so tracks can make room for each other, duck on each other, and be seen together.
7.1 How the copies find each other
Every Harmonia in a session joins a shared bus, a small piece of memory shared on your computer, and finds the others there: no routing, no setup. Up to 32 can join. They find each other across plug-in formats (VST3, AU and CLAP) and across the separate processes a DAW may run its plug-ins in. That was measured on macOS with test programs, not yet inside a DAW: see Known limitations, also for Windows, Linux and Logic Pro.
One bus, more than one project. The Harmonias of every project your DAW has open share the bus, not only those of the project you are mixing: they show as chips, take places of the 32, and share the session’s MONO, the STAGE’s ACTIVATE and PLAYBACK. Close the projects you are not mixing. On Windows the bus is shared by every Harmonia you run while logged in, even in a second DAW open at the same time (from the code: not yet tried on Windows).
The status. The ecosystem strip shows ECOSYSTEM and, under it, the state of the bus:
SHARED 4/32: the shared bus is open; here 4 Harmonias are on it.SHARED - FULL: 32 Harmonias are on it.LOCAL ONLY(in red): the shared bus could not be opened. This copy can then reach only Harmonias of the same format (all VST3, all CLAP or all AU) that the DAW runs in the same process as this one (see Process in the Glossary).
Hover the status for the full text.
Versions. Harmonias of different versions do not see each other: a 1.1.3 says so in that hover text when a 1.1.2 runs in the same session. Update every format: see Updating from 1.1.2.
Off the bus. A copy that is off the bus (ejected from TRACKS, or loaded when 32 were already there) still works as an EQ. The others do not see or hear it, and its YIELD and PUMP stop; its SURFACE still takes the other tracks into account, and the session’s MONO still applies to it. Its strip shows JOIN ECOSYSTEM: click it to join again. While 32 are on the bus, the button reads SESSION FULL and the click does nothing.
7.2 A Harmonia on the mix bus
You can put Harmonia on your mix bus, for example to hear the whole mix in mono with HEAR, or for a broad move with one of the Mix presets. But to the other Harmonias, that copy is one more track, and that track is the whole mix. Left in the ecosystem, it changes how the others work:
- every track whose YIELD is aimed at all the others also makes room for the whole mix, so it is cut deeper;
- it can trigger PUMP, like any track with plenty of low end;
- HEARD can rate the other tracks as buried, covered by the mix bus;
- with MONO on, it makes room for the tracks, and they for it.
So take that copy out of the ecosystem: open TRACKS and click ✕ in its row. It keeps working as an EQ, HEAR included, and the project remembers that it is out. Or keep Harmonia off your mix bus.
The same goes, on a smaller scale, for a Harmonia on a group bus (drums, music) whose tracks also have Harmonias of their own: those tracks then count twice, for a YIELD aimed at every other track, for automatic PUMP keys and for HEARD. Aim YIELD and PUMP by hand (click the chips for YIELD; for PUMP, right-click a chip and choose Pump from (sidechain key)), or take that copy out of the ecosystem too.
7.3 The ecosystem strip

From left to right:
- The colour dot and the name box. This track’s name, shown in capitals. You can type up to 20 characters; a name taken from your DAW can be a little longer. The other Harmonias show its first letters (7 at most) on its chip, and more of it in TRACKS. While the box holds a default name (TRACK and a number, HARMONIA, or nothing), Harmonia takes the next track name your DAW sends, in VST3, AU and CLAP alike. Any other name stays as it is, even if you rename the track in your DAW later.
- ● (track colour): Automatic, or one of eight colours. Every other Harmonia sees it.
- G (group): None, or Group 1 to 8. See Groups.
- LEAD? or LEAD: gives this track the star or takes it away. See LEAD.
- ECOSYSTEM and the bus status: see above.
- The chips: one per other Harmonia, as many as fit; a +N box counts the rest and opens the full list. Each chip has a live level meter, a pan dot and an overlay eye. Marks on a chip: ▼ means the track is in this track’s YIELD set, K means you chose it as a key for this track’s PUMP (automatic keys carry no mark), and a dot marks a track that holds the LEAD.
- TRACKS: the list of every Harmonia. See TRACKS.
- OVERLAY: the master eye switch. On: every other copy’s spectrum is drawn as a thin coloured line in your display. Off: none is drawn or read, which is lighter on your computer.
Clicks on a chip:
- Click a chip to add that track to this track’s YIELD set, or to take it out. While YIELD is aimed at every other track, a click narrows it to that track only. With YIELD under 5 %, the click also sets it to 50 %.
- Click its eye to show or hide its spectrum in your display.
- Right-click it for the full menu:
Yield to this track,Pump from (sidechain key),Show overlay, andAlign my low end to this track.
When no other Harmonia is there, the strip says: “Add Harmonia to another track: it appears here, and they hear each other.”
7.4 Make room: YIELD
For: letting this track step back where other tracks play, band by band, with no routing: the bass under the kick, a pad under the lead, the music under the vocal. On a full music bus under a vocal the change is small: see Let a vocal sit over the music.
How it works: YIELD cuts this track only in the frequency bands where the tracks it yields to have energy, by up to 12 dB per band (14 in MONO). It follows their energy with some smoothing, so it is not a dip on each hit: on a steady beat the cut stays down while they play, and it lets go within about a second after they stop (for a dip on every hit, use PUMP). It is a spectral sidechain: a sidechain that works frequency by frequency, with nothing to route.
Who it yields to. The button under the knob says it:
| The button reads | Meaning |
|---|---|
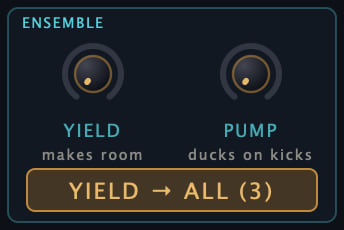
YIELD → ALL (3) | Every other Harmonia (here, 3 of them). A new Harmonia starts like this. |
YIELD → 2 SELECTED | Only the tracks whose chips you clicked (here, 2). |
YIELD → NOBODY | No target: YIELD does nothing. |
MONO → ALL (3) | The session’s MONO is on and nobody is chosen: MONO aims this track at every other one. |
NO OTHER TRACKS, NOT ON THE BUS | There is nobody to yield to. The knob and the button are dimmed. |
Click the button to aim YIELD at every other track; click it again to aim it at nobody, then pick chips. Switching it on with YIELD under 5 % also sets YIELD to 50 %. (Its hover text calls it VS ALL.)
Try: 30–50 %. How much that cuts depends on how loud the other track is compared with this one, frequency by frequency, and on how alike the two sound. Measured with two sounds of the same tone balance, where the cut is deepest: next to nothing when the other track is 6 dB quieter, about 1 dB when both are equally loud, 2–4 dB when the other is 4 dB louder. Two sounds that differ are cut deeper where the other one is the stronger. From 70 % up the cut is deep against a louder track. Quiet tracks are cut less.
See it: the violet strip along the bottom of the display shows where the whole spectral engine is cutting, YIELD included. Click YIELD VIEW to see YIELD’s own cut.
Good to know:
- YIELD is 0 on a new Harmonia: nothing steps back until you turn it up, and it needs at least one other Harmonia. If you turn it up while this copy is alone, a hint says NO OTHER HARMONIA YET.
- A track with the LEAD star gets more room from the others.
- While the session’s MONO is on, YIELD works at 40 % at least on every Harmonia, even with its knob at zero (except on one in TRACKING).
- YIELD is a spectral layer: it puts the analysis window in the audio path, and TRACKING holds it down. With LAT off, the track drops out or clicks for a moment each time YIELD leaves 0 or goes back to it.
- A hand-picked set is saved by the tracks’ places in the session, and so are the PUMP keys you chose, the eyes you switched off and a low-end alignment key. If you remove a Harmonia, or your DAW loads them in another order, check them when you reopen the project (see Known limitations).
7.5 See what YIELD does: YIELD VIEW
Click YIELD VIEW at the top right of the display. Three lines appear at the top of the display, and YIELD’s own cut is drawn as a dashed curve, with the other tracks’ outlines.
- Line 1: who this track yields to, for example “Selected: DRUMS” or “All other tracks: VOCAL, DRUMS, BASS”.
- Line 2: why it is or is not cutting right now. While it cuts: “Envelope up to 4.3 dB of cut”. When it does not, for example: “YIELD is at zero - turn it up to make room”, “No source selected - click a track below or the button under YIELD”, “Selected source is quiet - no reduction”, “MIX is at 0 % - YIELD is not heard”, “Tracking mode - YIELD is suspended”.
- Line 3: what the curve is: the cut YIELD asks for, before Harmonia smooths it together with its other spectral layers, and before AUTO and MIX.
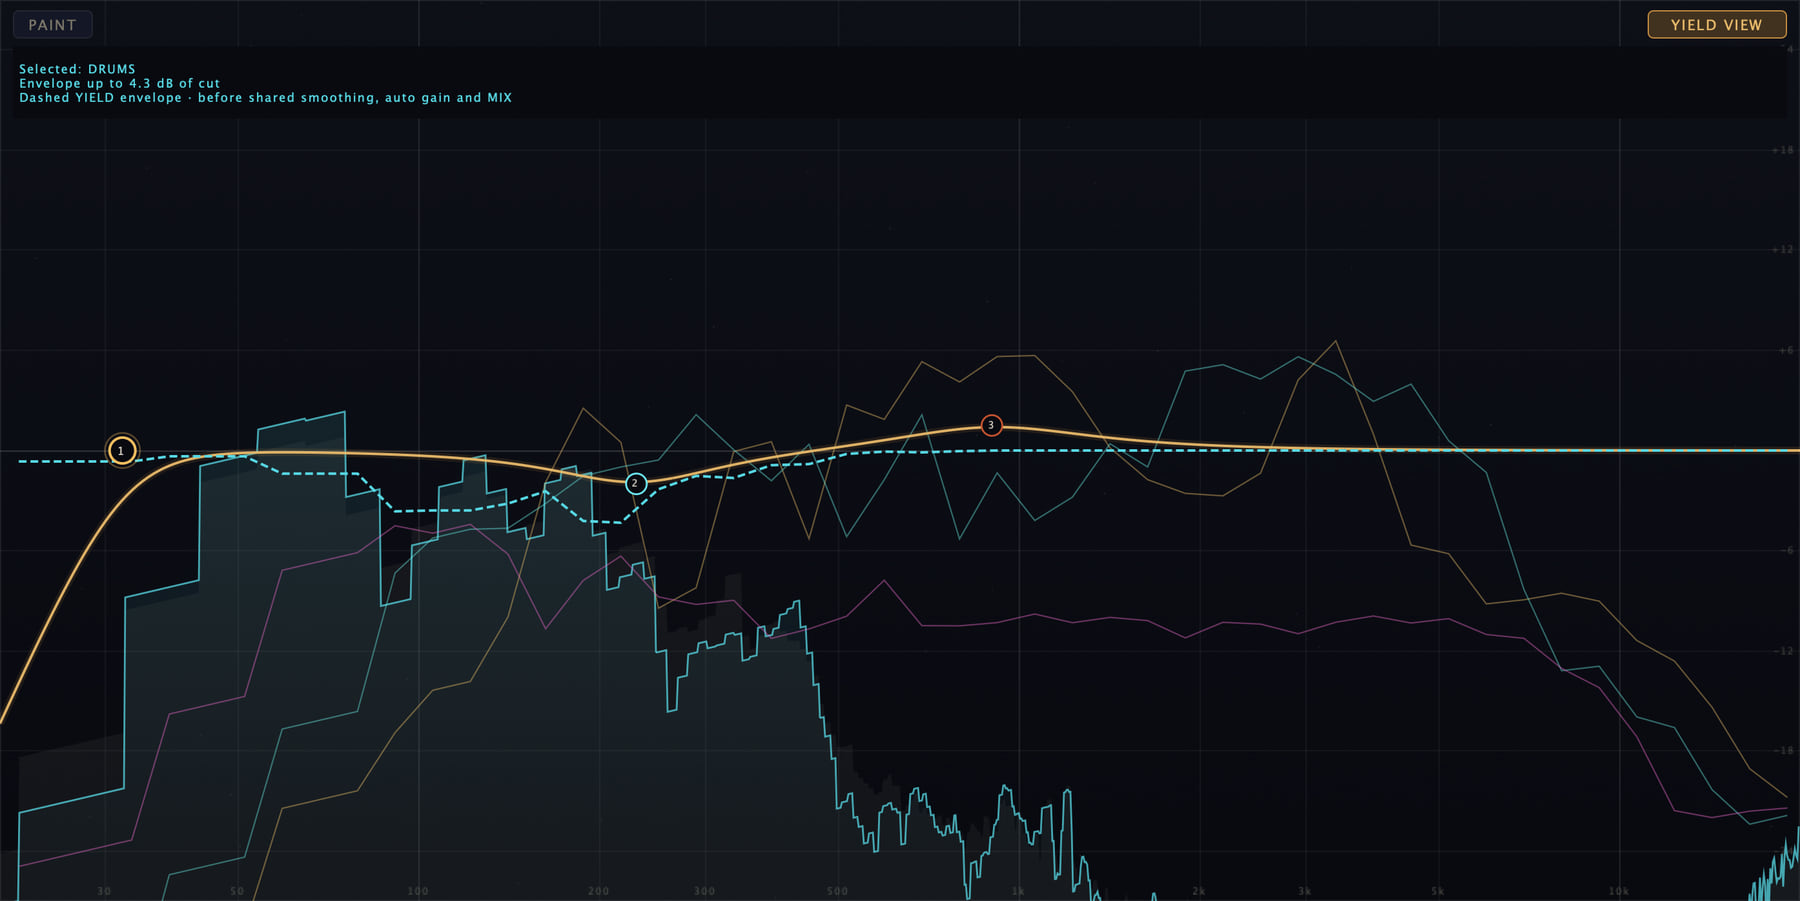
YIELD VIEW shows what YIELD asks for. It is not a measurement of the final output, and not a HEARD score. While it is on, the two strips along the bottom of the display (the violet one and MASKED BY OTHERS) are hidden.
7.6 Mark the star: LEAD
For: the element that carries the song, usually the lead vocal.
How it works: Harmonia already judges importance by itself, moment by moment. It calls this salience: how loud a track is, times how alive it is (moving melodic parts read as foreground, static beds as background). The louder, livelier track wins while it plays; about half a second after it stops, the room passes to whoever is still playing. A vocal can lose to a fuller, busier track: the star is there to help it.
The star is the one human override. YIELD counts a LEAD track as 1.6 times more important: the others yield to it more, and its own YIELD cut gets smaller (down to a third against an equal track, hardly smaller against a far louder, busier one). PUMP ducks it as before. On the STAGE its figure stands nearer the front, unless you placed it yourself; that moves only the figure, not the sound.
How: press LEAD? at the bottom left (it then reads LEAD), click the role box in TRACKS, or double-click its figure on the STAGE. More than one track can hold the star.
In TRACKS, a role box that reads LEAD? is a suggestion: the salience has been pointing at that track lately. Harmonia never gives the star by itself. (On the strip, LEAD? is simply the button’s label while this track does not hold the star.)
7.7 Duck on the kick: PUMP
For: the pumping feel of sidechain compression, with no routing: this track ducks itself when a key track hits.
Which tracks are keys. By default, every other Harmonia with plenty of low end (at least 30 % of its energy below about 150 Hz, as Harmonia measures it): the kick, often a bass, and at times other tracks, such as guitars. To choose yourself, right-click a chip and choose Pump from (sidechain key), or click the K box in its TRACKS row. Then only the tracks you chose key PUMP, and their chips show a K. A track never keys itself, and a key needs its own Harmonia.
What triggers it. A peak that stands well above the key’s own average level: a drum hit does that, a held pure tone or a slow swell does not. A held buzzy sound (a saw or square bass, a voice) does it for as long as it sounds, and a bright bass that has a Harmonia counts as a key by default: then choose the kick as the key yourself.
Try: 20–40 % for a groove you feel more than hear; 60–100 % is the obvious EDM pump. At 0 there is no ducking at all.

The PUMP menu (right-click PUMP), in the menu’s order:
- Attack: 2, 6 (the default), 15 or 40 ms.
- Release: 80, 150, 220 (the default) or 500 ms. The number you pick is a centre, not the release itself: the release follows your DAW’s tempo (0.45 of a beat) and stays between 0.6 and 1.8 times that number. At 120 BPM the four choices give 144, 225, 225 and 300 ms.
- Depth: 3, 6, 9 (the default) or 12 dB, the most it ducks.
Good to know: PUMP ducks the same at every buffer size and in an offline bounce. If your DAW processes the pumping track before its key, the duck comes one buffer late. When a key track stops being processed (some DAWs stop calling a muted or stopped track), the pumping track is let go after a quarter of a second and comes back with its release. The LEAD star does not change PUMP. Keys you chose are saved by the tracks’ places in the session: check them when you reopen a project.
7.8 Line up two low ends
For: two tracks that play the same low notes with a fixed timing offset between them, such as one instrument recorded on two tracks. When such tracks are slightly out of step, their low ends can partly cancel; the alignment moves one of them in time to fit the other.
How: on one of the two tracks, right-click the other track’s chip and choose Align my low end to this track. Choose it again to remove it.
How it works: Harmonia compares the 40–120 Hz band of both tracks as you hear them, and corrects this track by a delay of up to ±4.35 ms at 44.1 kHz (±4.67 ms at 48 kHz, ±5 ms at 96 kHz), plus an all-pass filter (a filter that shifts phase without changing level). It searches every 2 s of processed audio. The correction is saved with the project, so a reopened or bounced project is aligned from its first sample; a project with no correction yet gets it 2 s in.
Good to know:
- While a key is chosen, Harmonia reports a constant 5 ms of extra latency to your DAW: that is what lets it move a track earlier as well as later.
- It is not made for a bass against a whole drum stem: there it changed the low end by 0 to −0.4 dB on the four songs measured.
- A correction that comes back with a reopened project is checked again against what the two tracks play now, and dropped if they no longer fit.
- The key is saved by its track’s place in the session: if a project reopens with another track in that place, choose the key again.
7.9 Groups
Click G on the strip and choose a group (1 to 8) to put this track in it. Members of a group share their YIELD set and their role (LEAD or not): a change made on any one of them (in its own window, from a TRACKS list or on the STAGE) reaches the others. A track that joins a group takes on what its members already have; the first member brings its own.
Example: put your backing vocals in one group, so they make room for the same tracks and hold or give up the star together.
7.10 TRACKS: every Harmonia in one list
Click TRACKS at the bottom right to open the list of every Harmonia on the bus. CLOSE goes back. Each row is a remote strip for that track, from this one window.
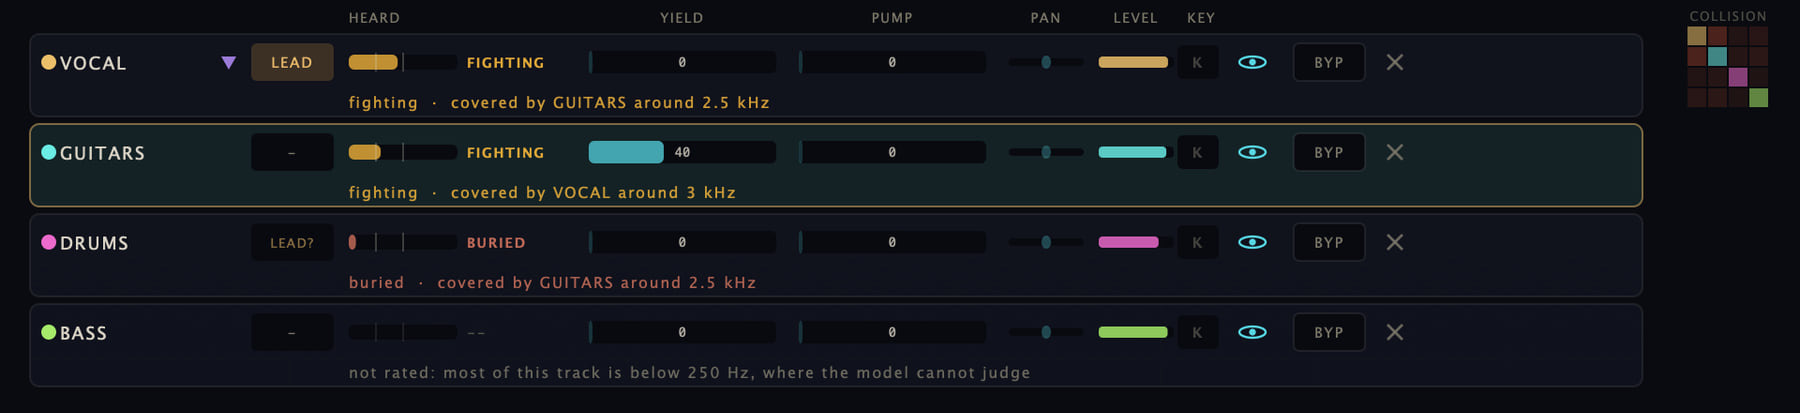
| In each row | What a click or a drag does |
|---|---|
| Colour dot and name | Adds that track to this track’s YIELD set (▼), or takes it out. While YIELD is aimed at every other track, every other row has the ▼, and a click keeps that track only. |
| Role box | Gives that track the LEAD, or takes it away. LEAD? is a suggestion. |
| HEARD | How audible that track is in the mix: see HEARD. |
| YIELD and PUMP bars | Drag to set those two amounts on that track. |
| PAN and LEVEL | Its placement and its level, to read. |
| K (column KEY) | Makes that track a key for this track’s PUMP, or drops it. With PUMP under 5 %, the click also sets it to 40 %. |
| Eye | Its spectrum in your display. |
| BYP | Bypasses that track’s EQ. |
| ✕ | Ejects it from the ecosystem: it keeps working as an EQ, but the others no longer see or hear it and its YIELD and PUMP stop. Its own strip shows JOIN ECOSYSTEM to come back. |
At the top of the panel, PLAYBACK sets what the HEARD meter models (see HEARD). Beside the list, COLLISION is a small grid: each square is a pair of tracks, and the redder it is, the more energy those two share in the same frequency bands. Scroll the list with the mouse wheel.
TRACKS reaches five things of each track: its YIELD and PUMP amounts, its LEAD, its bypass, and eject. Its bands and its other knobs are in its own window.
7.11 How audible is each track: HEARD
What it shows, in the HEARD column of TRACKS, once there are about 3 s of sound to judge:
- Each state compares the track with a simple case: the same track against another sound with the same tone balance.
CLEAR: the model hears the track better than it would if the track stood 3 dB louder than that sound.FIGHTING: between that and the two being equally loud.BURIED: worse than equally loud (with the track 3 dB below that sound, the model hears almost nothing of it). - The bar shows the same value; its two ticks are the lines between the states.
- Under a FIGHTING or BURIED row, a line names the track the model blames most and roughly where, for example “covered by KEYS around 1.2 kHz”. It is a place to start listening, not a place to cut: on our own test songs, against a simple energy rule, the named track matched less than half the time, and the frequency was often an octave or more too high. With PLAYBACK on a laptop or a phone, the line can blame the speaker instead.
- Not rated (the HEARD cell shows
--, and the line under the row begins “not rated:”): a track whose sound, as the ear weighs it, is mostly below 250 Hz (bass and subs, a kick without much click, a kick-heavy drum kit). There the model cannot judge. Any other track is not rated either for as long as the range where it is covered most lies below 250 Hz. Everything else is rated, noise as well as pitch: voices, guitars, keys, synths, pads, and also hi-hats and cymbals.
What it hears. Only tracks running Harmonia count, each at the level it leaves Harmonia: a channel fader, pan or plug-in after it is not heard. It judges in mono. It only listens: it changes no sample and adds no latency. A Harmonia on your mix bus counts as a track too, and then seems to cover all the others: take it out of the ecosystem (see A Harmonia on the mix bus).
How loud, and on what: PLAYBACK. The states depend on how loud the mix plays. PLAYBACK, at the top of TRACKS, sets this once for the whole session: the device the listener plays the mix on, and how loud a mix at −20 dBFS RMS sounds there.
- Studio monitors: flat, the model’s own reference.
- Laptop (MacBook Air M3 / ZenBook 14): the mean of those two laptops as Notebookcheck measured them. About −3 dB near 300 Hz, −21 dB at 100 Hz.
- Phone (iPhone 16 / Galaxy S24): the mean of those two phones, measured the same way. −8 dB at 500 Hz, −19 dB at 200 Hz, −35 dB at 100 Hz. Its presence peak (about +6 dB near 3 kHz) can make a bright track read a little clearer on a phone than on the monitors.
- Level: at 60, 70 or 85 dB SPL, or as MONITOR. The simple way is to pick a number. As MONITOR takes the Monitoring level from SURFACE’s right-click menu (Quiet 60, Normal 70, Loud 85 dB SPL; Normal unless changed) of the Harmonia that runs the meter, which you do not choose, and that setting also changes how SURFACE works. Choosing a laptop or a phone does not change the level: choose the level you want to model.
These are two good devices each, measured at maximum volume: cheaper ones, or the same ones turned down, can sound different. There is no headphone choice.
An estimate, not a verdict: a buried pad may be exactly what the song wants.
7.12 Place tracks on the STAGE
For: seeing the whole session as a stage seen from the mixing chair, and placing tracks left-right (pan) and near-far (distance) from one window.
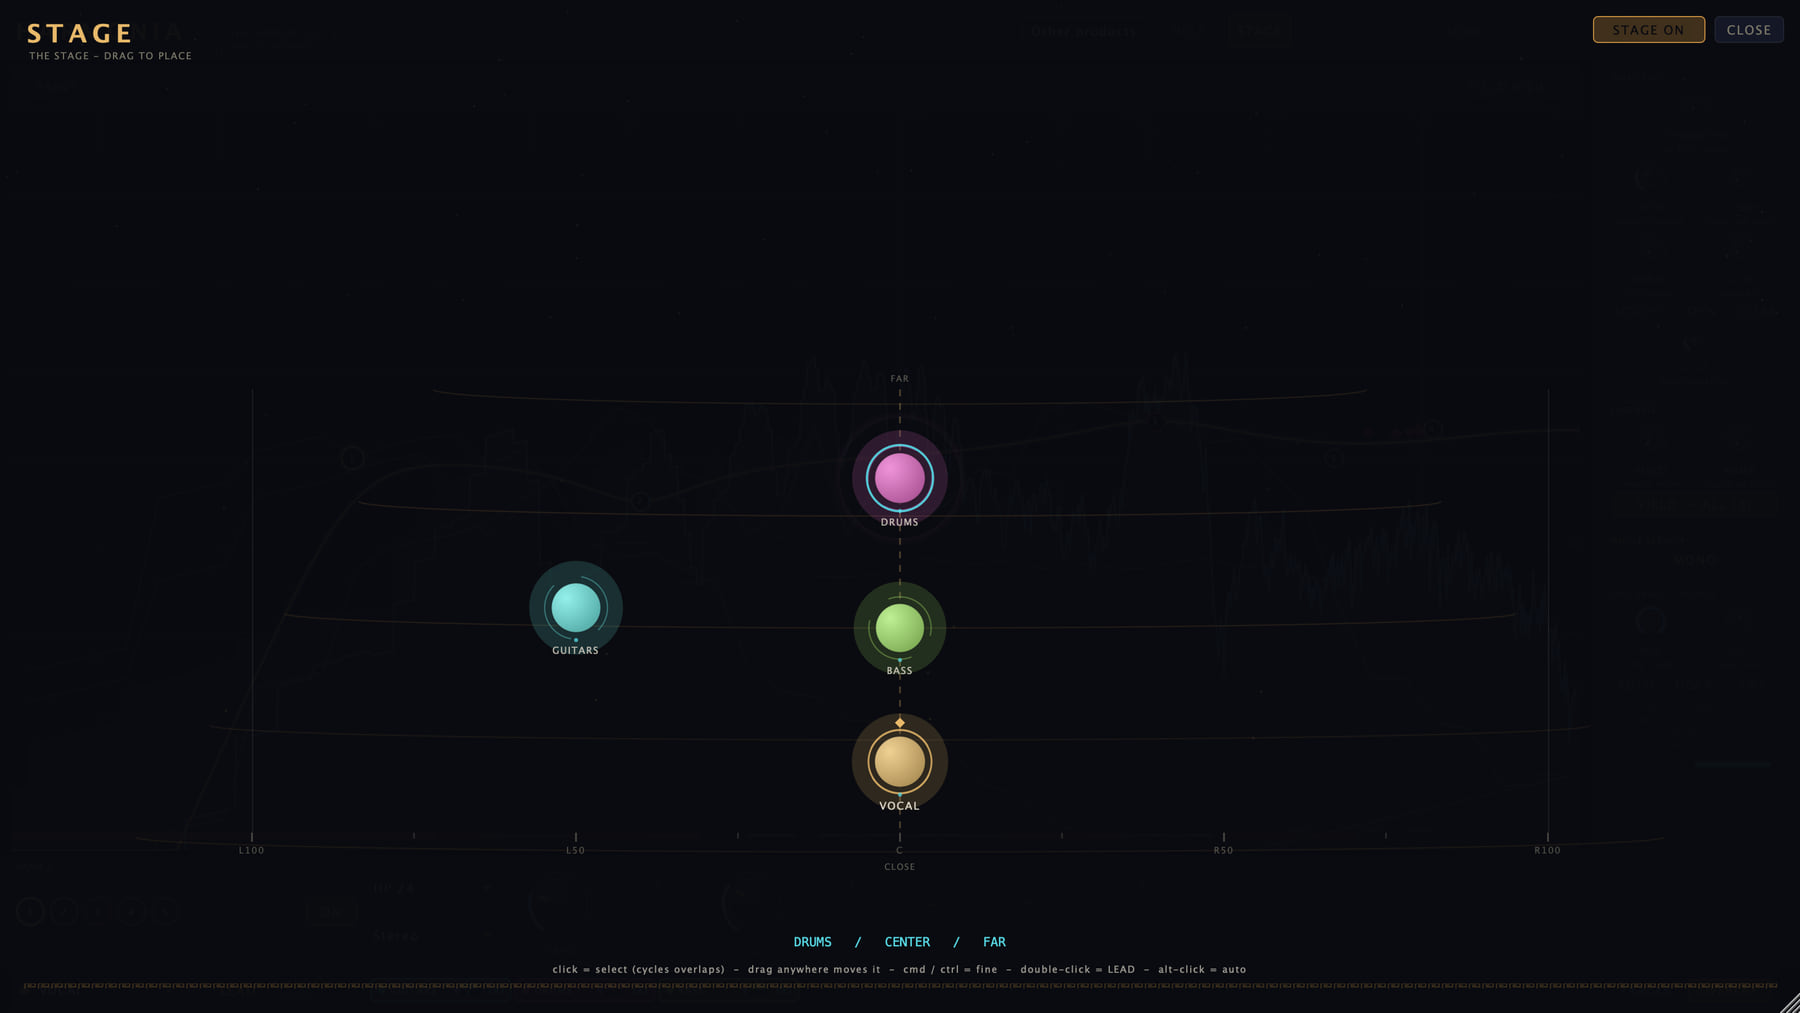
- Click
STAGEin the top bar. Every Harmonia is a figure: left-right is its pan, near-far is the distance you gave it (until you do, its live salience), and size and pulse show its loudness. - Click
ACTIVATEonce; it then readsSTAGE ON(click it again to switch the STAGE off). This switch is shared by every Harmonia in the session, and it is off in a new session. While it is off, the STAGE changes nothing in the sound, and a banner says STAGE OFF - POSITIONS ARE KEPT - CLICK ACTIVATE TO APPLY THEM. The STAGE pans inside Harmonia, on top of your DAW’s own pan knob, which it never moves. - Click a figure to select it (clicking a crowded spot cycles through the overlapping tracks; a cyan ring marks the selected one). Then drag anywhere on the field: sideways pans it (it snaps to C, 25, 50, 75 and 100), up and down sets its distance. Hold Cmd or Ctrl for quarter-speed fine placement.
- Double-click a figure to give it the LEAD, or to take it away. Alt-click it to undo your placement: the track is no longer panned or given a distance, and its figure goes back to where its salience puts it.
CLOSEgoes back to the EQ.
Distance is tone only: the further back, the less air (around 6.5 kHz) and presence (around 3 kHz); at the very front, a touch more of both. It has no gain of its own, so a bright track gets a little quieter far away, unless AUTO makes it up. It is the same on both channels, so it is safe in mono. The higher on the stage, the further away and the darker.
Good to know: positions are saved with the project, and each A/B slot keeps its own. A cyan pin marks the tracks you placed by hand. A Harmonia on a mono channel has one output and cannot be panned: only its distance applies. A pan move glides there in under a second rather than jumping. In MONO the pans you set on the STAGE glide to the centre (the distances stay), and come back when you leave MONO. The STAGE marks the LEAD with a small diamond.
7.13 Capture and recall the ecosystem
In the preset menu, under Ecosystem, Capture every instance's YIELD, PUMP and LEAD stores, for every Harmonia in the session, its YIELD and PUMP amounts and whether it holds the LEAD (not who YIELD is aimed at, nor the PUMP keys). Recall puts them back; the menu says how many tracks a recall reaches now (for example “Recall 2 of 4 instances”). Recall finds the tracks by their names; two tracks with the same name each get their own values back, as long as both are still there.
The capture is kept by the Harmonia whose menu you used, until the project closes: it is not saved with the project, so recall it from the same Harmonia. Use it to try another balance and come back to the first.
8 Check your mix in mono
Many listeners hear music in mono, or close to it: club systems, phone speakers, radio. Two tools help.
8.1 MONO: mix for mono, whole session
For: making the mix hold up on mono systems, with one click for the whole session. MONO changes how every track is processed; to listen in mono, use HEAR.
What it does: every Harmonia in the session switches to mono-first mixing. The output stays stereo. What changes everywhere:
- Placement: the pans you set on the STAGE glide back to the centre (the distances stay), and come back when you switch MONO off. Your DAW’s own pan knobs are not touched.
- YIELD digs deeper (up to 14 dB) and switches itself on: a track whose YIELD knob is below 40 % yields as if it were at 40 %, even at zero, to make up for the separation that panning was giving you. A track with no target chosen yields to all the others; a chosen target stays the only one. A Harmonia in TRACKING keeps YIELD down.
- The stereo part of each track (its Side channel: what differs between left and right) is turned down by 1.4 dB and filtered below 250 Hz (by default), gently: 12 dB per octave, so the bass fades out below that point rather than stopping there. Measured with MONO on: 4.4 dB down at 250 Hz, 14 dB at 125 Hz, 26 dB at 62.5 Hz, and 1.4 dB from 1 kHz up. So wide or out-of-phase bass is mostly taken out of the stereo mix, and the low end you hear in stereo comes close to what a mono system plays.
Switching MONO can make every track click. MONO switches YIELD on, and YIELD needs the analysis window: every Harmonia on the bus that was not using the window yet (except one in TRACKING) now puts it in its audio path. With LAT off, each of those tracks changes its latency and drops out or jumps once, at the switch (see When Harmonia adds latency). To avoid it, click LAT on those tracks before you switch MONO.
Good to know: sound that is out of phase between left and right still cancels in mono: check it with HEAR. Switch MONO from any Harmonia and it flips for all of them; it is saved with the project, and a new session starts with it off.
The MONO menu (right-click): where this track’s Side high-pass sits: 120, 180, 250, 350 or 500 Hz. Each Harmonia keeps its own. 120 Hz suits a wide acoustic recording; 350 or 500 Hz suits dense material that sounds much worse in mono.
8.2 HEAR: listen in mono
For: hearing this track, or a bus, summed to mono, instantly.
How: click HEAR in the OUTPUT zone; click it again to go back. Put it on your drums, a group bus or your mix bus, and hear what a mono system plays. On the mix bus, take that Harmonia out of the ecosystem first: see A Harmonia on the mix bus.
Good to know: HEAR is an audition only. When your DAW reports an offline render, HEAR is skipped and the mixdown stays stereo. Any other bounce, realtime ones included, records what you hear: switch HEAR off before you bounce.
HEAR’s right-click menu also holds this track’s bypass.
9 Level, output and meters
The bottom zone of the rail, THIS TRACK - OUTPUT, sets the level that leaves Harmonia and shows the meters.
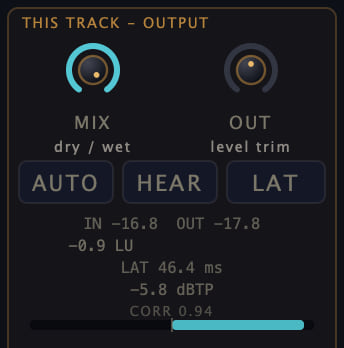
9.1 MIX
MIX blends the processed sound with the dry input; 100 % is fully processed. The blend is latency-compensated, so the two stay in time. PUMP, the STAGE’s panning, the output ceiling and HEAR come after MIX, so they act at any MIX setting, 0 % included. Pull MIX below 100 % to soften an aggressive curve, or for parallel EQ.
9.2 OUT and the ceiling
OUT trims the level of the processed sound, from −24 to +24 dB. It sits before MIX: with MIX below 100 % the dry part of the blend is not trimmed, and at MIX 0 % OUT does nothing.
Right-click OUT for the output ceiling: Off, −0.3, −1.0, −3.0 or −6.0 dBFS. It is a soft limit, transparent up to 2.5 dB below the ceiling, then rounding peaks smoothly into it. It bounds sample peaks. The dBTP readout shows the peak between samples, which can still sit a couple of dB higher: a converter draws a smooth curve through your samples, and that curve can overshoot every one of them.
9.3 AUTO: compare tone, not level
AUTO continuously matches the loudness of the processed sound to the input, so you judge your EQ by its tone instead of being fooled by “louder sounds better”. It matches the sound before OUT, MIX, PUMP, the STAGE’s panning and the ceiling act on it, so OUT still changes the level by what you set. It corrects 12 dB at most. The live correction shows in the rail as AG followed by the dB.
9.4 Bypass
Right-click HEAR and choose Bypass this track (crossfaded, latency-matched). The button reads BYP while the track is bypassed; click it to come back. The bypass is a 10 ms crossfade to the input, delayed exactly as the processed sound is, so nothing clicks and nothing moves in time.
In the VST3 and the AU, a DAW that hands its bypass button to the plug-in gets the same crossfade (which DAWs do so was not tested). In the CLAP the DAW always bypasses in its own way. A track can also be bypassed from another Harmonia’s TRACKS list (BYP).
9.5 The meters
Under the OUTPUT zone’s buttons, at the bottom of the rail:
| Readout | What it says |
|---|---|
| IN … OUT … | Momentary loudness (LUFS, measured over 400 ms) of what comes in and of what leaves the plug-in. |
| +0.0 LU | The difference, OUT minus IN: how much louder (+) or quieter (−) Harmonia makes the track. Cyan while it is within ±0.5 LU. |
| AG | AUTO’s correction, while it is working. |
| LAT | The latency Harmonia reports to your DAW. |
| dBTP | The true peak of the output, between samples. Red past 0 dBTP. |
| CORR | Left-right correlation: +1 is mono, 0 unrelated, −1 inverted. The bar turns red below zero. |
| PRE-RING | Linear phase only: how loud the pre-ringing is. Red above −40 dB. |
10 Latency, recording and linear phase
10.1 What latency is
Latency is a delay. Some processing has to look at a short stretch of sound before it can act, so the sound comes out a little later. Your DAW makes up for it by delaying the other tracks by the same amount (delay compensation): while you mix, you do not notice it. While you record or play through the plug-in, you can feel it.
10.2 When Harmonia adds latency
- None: the bands, GLUE, PUMP, MIX and OUT add no latency.
- One analysis window: while a spectral layer is on (REIN unless its zero-latency mode is on, CLEAN, GLOW, SURFACE, SCULPT, YIELD, and MONO, which switches YIELD on), while the bands run in linear phase, while a brickwall filter is on, and while SCULPT’s menu captures a spectrum for Match a reference. The window is 2048 samples at 44.1 or 48 kHz, 4096 at 88.2 or 96 kHz and 8192 at 176.4 or 192 kHz: 43–46 ms at each of those rates.
- 5 ms: while a low-end alignment key is chosen. It is reported to your DAW.
- About 4 samples: CHARACTER, while it is above zero; not reported (0.08 ms at 48 kHz).
The window’s latency follows the layers: it appears when the first one engages and goes back to zero when the last one is released. At each of those switches your DAW is told a new latency and has to re-sync the tracks, and this track’s sound is interrupted: the first time it goes silent for one window (43–46 ms); after that it jumps by one window, which you hear as a click on most material. LAT avoids that.
10.3 LAT: keep the latency constant
Click LAT (in the OUTPUT zone, beside HEAR) and the window’s delay is there from the start: switching layers on and off no longer changes the latency, and no longer makes the sound jump. While nothing is engaged, the engine then only delays the sound: it runs no analysis. Leave it off while recording, on while mixing. A low-end alignment key still adds its 5 ms, and TRACKING still takes the window out.
10.4 TRACKING: no window latency while you record
Right-click LAT and choose, under While recording, Tracking - no window latency: REIN by notches, the other spectral layers held down.
The analysis window then leaves the audio path, whatever is on. REIN keeps working through its zero-latency notches, with a cut that is usually shallower and less even. CLEAN, GLOW, SURFACE, YIELD, SCULPT and the brickwall filters are held down, because each needs the window; linear phase is held down too, and the bands keep working in minimum phase. What remains: a low-end alignment key’s 5 ms and, while CHARACTER is above zero, its 4 samples. Choose Normal - every layer available to go back.
10.5 Linear phase
Ordinary EQ bands (minimum phase) shift the timing of the frequencies they change a little. That costs no latency. Linear-phase bands do not shift timing, at a price: one analysis window of latency, and ringing before a sharp sound as much as after it (pre-ringing).
Right-click LAT and choose under Bands: Minimum phase (no latency of their own) or Linear phase (one analysis window; the curve shows what it delivers; pre-ring shown). The PRE-RING readout in the rail shows how loud the pre-ringing is.
What linear phase cannot do. It sets one gain per frequency step of the analysis, and the steps are 23.4 Hz apart at 48 kHz. So a band narrower than a few steps gets less than its setting: a −12 dB bell at 60 Hz with Q 8 delivers −1.45 dB. Notches, bands narrower than about 50 Hz and steep high-passes below about 100 Hz come out weaker than set. The curve on the display shows what is delivered; the band’s node stays at its setting.
Also in linear phase: each band still works where it is placed (Mid, Side, Left, Right). A dynamic band’s move begins about 10 ms before the sound and is complete about 16 ms into it. An All Pass band does nothing. TRACKING holds linear phase down (the bands then work in minimum phase), and a factory preset puts the bands back to minimum phase.
11 The display
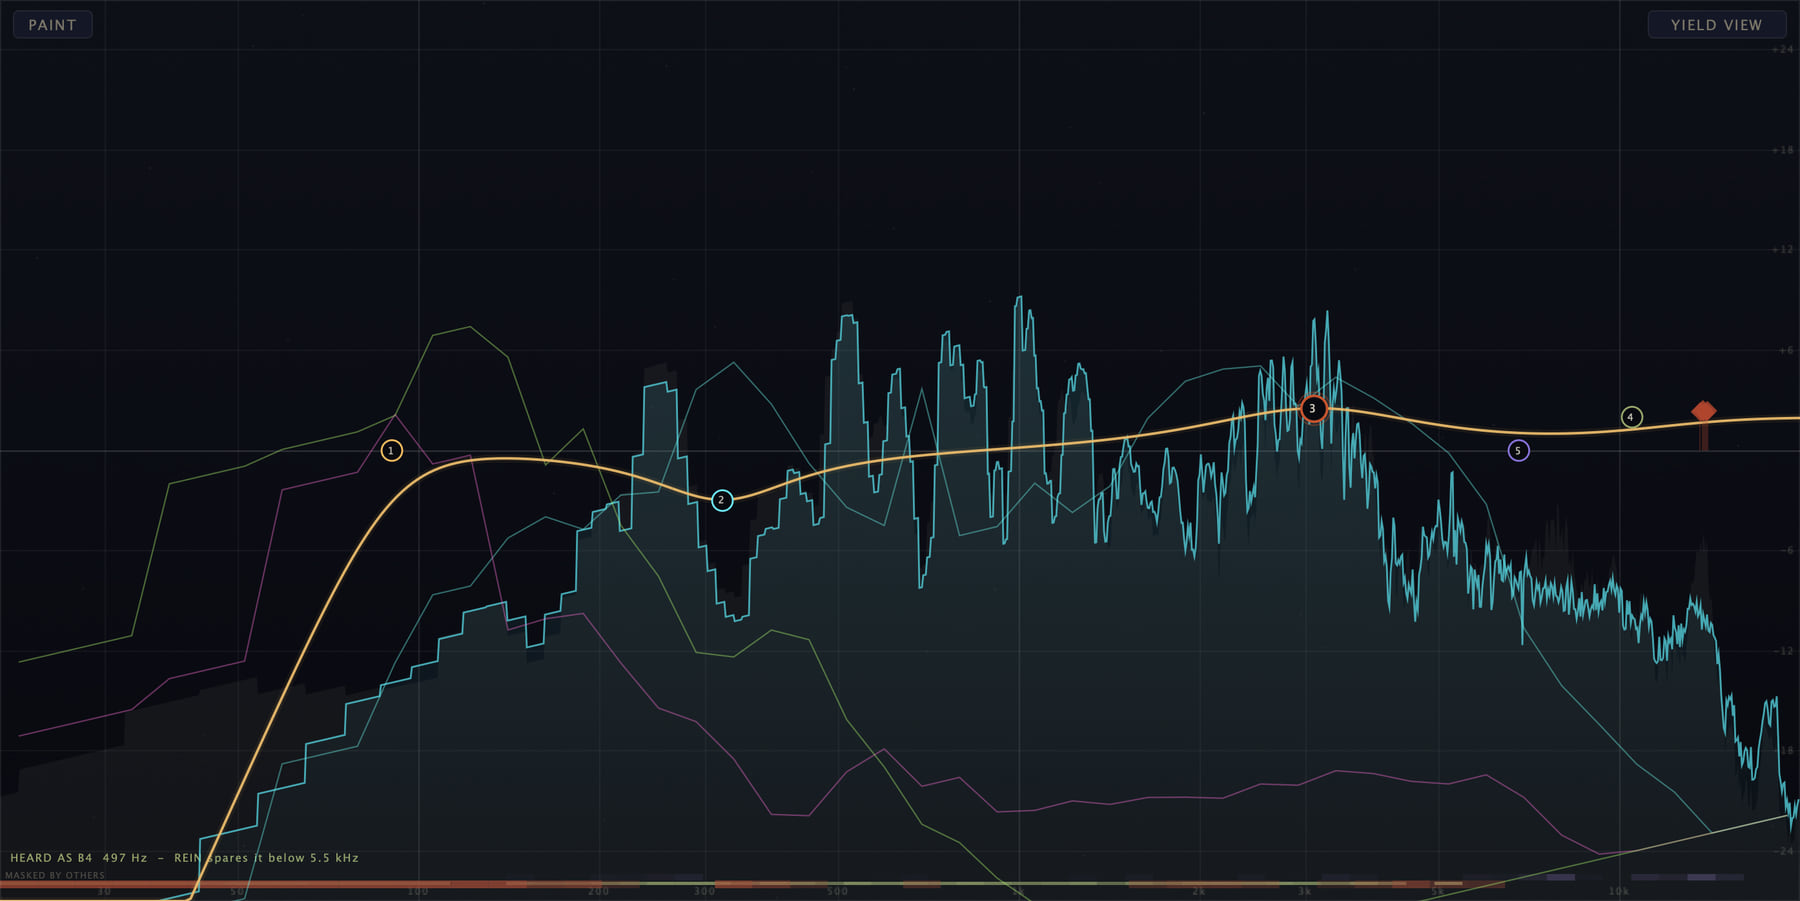
11.1 What you see
- Dim silhouette: the sound coming in.
- Cyan: the processed sound, before the ceiling, HEAR and the bypass.
- Bronze curve: your EQ. It breathes when dynamics move it.
- Thin coloured lines: the other Harmonias, one line for each eye that is on (OVERLAY switches them all).
- Violet curve: your painted SCULPT curve.
- Violet and cyan strip along the bottom: what the whole spectral engine (SCULPT, REIN, CLEAN, YIELD, GLOW and SURFACE together) is doing right now, frequency by frequency. Violet is cutting, cyan is lifting, brighter is more.
- MASKED BY OTHERS: a red strip at the very bottom, band by band, where another Harmonia track is louder than this one; the redder, the further it stands above (up to 24 dB).
- Red diamonds: REIN’s six deepest cuts. Olive marks and the HEARD AS line: the note REIN recognised and the frequencies it spares (see REIN).
- Under the pointer: the note, the frequency and the cents.
- A red banner while a band is in LISTEN.
The two strips along the bottom and the olive marks are hidden while YIELD VIEW is on.
11.2 The display menu
Right-click an empty spot of the display:
- Slope: how the spectrum is tilted on screen: 0 dB/oct (true spectrum), 3 dB/oct (pink is flat), 4.5 dB/oct (the default) or 6 dB/oct. The other tracks’ lines follow it.
- Range: 60, 96 (the default) or 120 dB of spectrum on screen.
- Freeze stops the spectrum moving. Peak hold keeps its peaks.
- Channel: Mid (the default), Side, Left or Right: which channel the spectrum shows. When it is not Mid, its name is written at the top right, left of YIELD VIEW.
- Spectrogram: the spectrum over time.
- Masking field (the model’s masked threshold): shades the level under which SURFACE’s model treats a frequency as buried by its neighbours. It is a model’s line that nobody has checked against a listener: on a vocal, much of the screen still lies under its edge (the valleys between partials, breath, sibilance). With the display on Side, Left or Right, it is still the Mid channel’s threshold.
These are settings of the picture, not of the sound. They are saved with the project, but they are not parameters your DAW can automate.
12 Presets, A/B and undo

12.1 Load a preset
The preset box in the top bar names the preset that is loaded. It reads Custom as soon as you change a setting, and the name again if every setting is put back. < and > step through the factory presets. Click the box for the menu:
- Search…: find a preset by name or tag.
- Favourites () first, then the factory presets by category, then your own under User, in alphabetical order.
- Ecosystem: capture and recall the YIELD, PUMP and LEAD of every Harmonia (see Capture and recall the ecosystem).
- Your presets: Save current as…, Load a preset file…, and Favourite / unfavourite the last loaded.
The 24 factory presets:
| Category | Presets |
|---|---|
| Init | Init - Flat |
| Vocal | Air & Presence · De-Harsh · Radio |
| Drums | Kick Punch · Snare Crack · Bus Tight |
| Bass | Tight Lows · Make Room (Yield) |
| Guitar | Shimmer · De-Box |
| Piano | Concert Air |
| Synth | Make Room (Yield) |
| Mix | Gentle Smile · Warm Master · Crystal Master · Push Back (Depth) |
| Creative | Telephone · Underwater · Nasal Cut |
| Utility | Rumble Filter · Soften Esses · Soothe (Rein Only) · Side Sparkle (M/S) |
A Mix preset on your mix bus: take that Harmonia out of the ecosystem first (see A Harmonia on the mix bus).
12.2 What a factory preset changes
A factory preset sets the sound: the bands and knobs to the preset’s values, and the other settings your DAW can automate (such as AUTO, SCULPT and the knobs’ right-click settings) back to a new Harmonia’s value. So a preset gives the same result whatever knobs and settings were there before. It also clears the painted SCULPT curve.
It leaves alone:
- LAT and TRACKING. But linear phase, chosen in LAT’s menu, goes back to minimum phase.
- The track’s own things: its name, colour, group, LEAD, YIELD targets and PUMP keys. Exception: Init and the two (Yield) presets aim YIELD at every other track.
- HEAR, the bypass and a band in LISTEN (right-click HEAR; right-click the node): switch them off yourself.
- The low-end alignment, the STAGE place and the session’s MONO.
- The display’s settings, the window size and the MIDI map.
While TRACKING is on, a preset sounds the way TRACKING allows: its REIN works through the zero-latency notches (shallower cuts), and the YIELD of the two (Yield) presets stays held down.
12.3 Save your own
SAVE(top bar) saves the complete current state, all bands and knobs and the painted curve, as a preset file (.harmonia). The save dialog opens in your preset folder: save it there and it appears in the menu under User.Save current as…(preset menu) asks for a name, and tags to find it by.Load a preset file…opens a preset kept anywhere and puts a copy in your preset folder. Files that SAVE wrote in earlier versions load too.
A preset of your own brings back its settings and its painted curve, and nothing else: not the track’s name, colour, LEAD, YIELD targets, PUMP keys, group, STAGE place, bypass, window size, display settings or MIDI map, nor the session’s MONO or PLAYBACK.
Your presets and favourites live in the Presets folder inside ~/ on macOS, %APPDATA%\ on Windows, and ~/ on Linux.
12.4 Compare with A/B
A/B keeps two independent snapshots of this Harmonia. Click A to flip to B; the letter shows which one you hear. Make a bold move, flip back, and let your ears decide. A→B copies what you hear now into the other slot (it reads B→A while you are on B): use it as a checkpoint before you experiment.
Loudness-matched A/B. Right-click A/B and choose Loudness-matched - compare the processing. B is then turned up or down, by up to 12 dB, so that it changes the level as much as A does (within 0.5 dB in our tests): you compare the processing, not the loudness. The trim shows above the button (for example “B trimmed -6.0 dB”). It is never applied in an offline render, and it is not saved with the project. As they are - louder may just sound better switches it off.
A flip never switches the session’s MONO, PLAYBACK target or STAGE; each slot keeps its own STAGE position for this track.
12.5 Undo
Cmd+Z (Ctrl+Z on Windows and Linux) undoes the last change to this Harmonia’s knobs, bands and settings; Shift+Cmd+Z or Cmd+Y redoes it. Click in Harmonia’s window first, so the keys reach it.
- These open a step of their own: a knob move; a change in the band strip’s type or placement box; a click on ON, AUTO, LAT, SCULPT or SCULPT’s DYN; a choice in the right-click menu of REIN and CLEAN, SURFACE, GLOW, CHARACTER, PUMP, DYN or LAT; loading a preset; H; Paste band.
- Everything else joins the step before it: what you do on the display (drawing a band, dragging a node, the mouse wheel on a node, most rows of a node’s menu), the arrow and Delete keys, a click on a band’s number, the output ceiling and MONO’s high-pass. So one press can take back several changes at once.
- Undo does not reach who YIELD and PUMP follow, the LEAD, groups, the STAGE, HEAR, MONO or the bypass. A YIELD or PUMP amount set from the ecosystem strip or from a TRACKS list joins the step before it, in the Harmonia it changed.
- The painted curve has its own Undo stroke, in SCULPT’s menu.
13 Help, updates and more
13.1 HELP and the hover texts
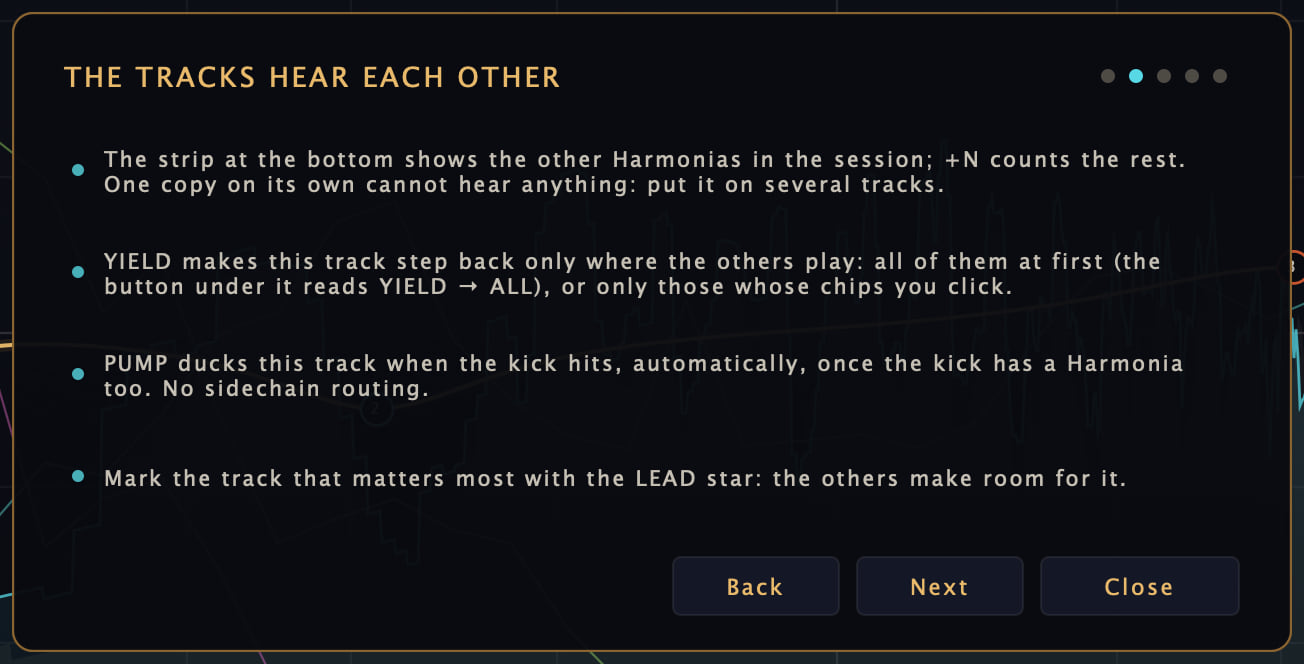
HELP in the top bar opens five cards: WELCOME TO HARMONIA, THE TRACKS HEAR EACH OTHER, THE DISPLAY, THE KNOBS, and TRACKS AND STAGE. Back and Next move between them. Got it on the first card and Close on the others close them, and so does HELP again. The welcome card opens by itself the first time you open Harmonia on a computer.
Hover almost any knob or button for its own explanation.
13.2 The update notice
About 2.5 seconds after its window opens, Harmonia asks arswerk.it for the newest version number. When there is a newer one, a strip above the top bar says “New version available” with the version, and two buttons:
Downloadopens Harmonia’s page on arswerk.it in your browser, where you sign in to download the newer version. If the page is not in English, choose EN in the site’s menu.x, at the right end of the strip, hides the notice until the next time the window opens.
The window grows by the strip’s height while it shows.
13.3 Other products
Other products, left of HELP, lists the other plug-ins and apps by Arswerk, with their offers. Each one opens its page on arswerk.it in your browser. The list is fetched from arswerk.it only when you open it. It closes when you click outside it, click its button again or press Esc.
13.4 MIDI learn, in the CLAP
In the CLAP version, you can move the rail’s ten knobs (CHARACTER, REIN, CLEAN, SURFACE, GLOW, GLUE, YIELD, PUMP, MIX, OUT) from a MIDI controller, in a DAW that sends MIDI to an effect plug-in. Right-click the knob, choose MIDI learn, and move a control on your controller. While it waits, the row reads “Waiting for a CC... (click to cancel)”; a learned knob offers Forget CC followed by its number.
The VST3 and the Audio Unit have no MIDI input, so they do not offer MIDI learn. There, use your DAW’s automation or its own controller mapping.
13.5 Automation
Your DAW can automate Harmonia’s parameters like those of any plug-in: the knobs, the bands, AUTO, LAT, SCULPT and most right-click settings. Of the 36 bands, only bands 1 to 8 can be automated: bands 9 to 36 are saved with the project but do not appear in the DAW’s automation lists.
HEAR, MONO, Harmonia’s own bypass (in HEAR’s menu), A/B, LEAD, who YIELD and PUMP follow, the STAGE and the display settings are not parameters: they cannot be automated.
The DAW’s list also shows a Harmonic Link switch for bands 1 to 8, which the window does not show. With it on in two or more bands, moving the frequency of one of them moves the others by the same ratio, from the second move on: the first move after the switch is turned on, or after the project is reopened, moves only that band.
The parameters are the same as in versions 1.0.6 to 1.1.2 (539 of them, with the same IDs), so automation carries over.
14 Trial, licence and what goes online
14.1 The 7-day trial
- The trial is 7 days with everything unlocked, exports included.
- The 7 days start the first time you activate the key in the plug-in on that computer, not the day you asked for it.
- The key has a use-by date (the email that brought it says which). The trial never runs past that date, so a key activated in its last days gives fewer than 7.
- The strip at the top of the plug-in shows the time left (“Trial: 7 days left” on the first day), in amber for the last 48 hours, and in hours and then minutes on the last day.
- One trial per email address and per computer.
When the trial ends, Harmonia passes the sound through unprocessed, and the strip says that the trial has ended and that your settings are saved. It has a Buy button. No panel opens, and your projects keep every setting.
14.2 Buy and activate your licence
A licence costs €79 and is yours for life. Buy €79 in the strip opens Harmonia’s page in your browser. In a browser signed in to your Arswerk account, the checkout starts by itself; in any other, the account page (sign in, or make an account) comes first, and the checkout follows it. A box called “Before you pay” asks you to tick your consent to immediate delivery (you then lose the right of withdrawal), and “Continue to payment” opens the payment page.
Your licence code arrives by email and appears in your account. Open the key panel (Activate in the strip; once the trial has ended, that button reads I bought it). With the computer online, paste the code and press ACTIVATE: everything unlocks for good on that computer.
The sound comes back at once, without reloading, in this Harmonia and in every other one that runs in the same process (see Process in the Glossary). If your DAW runs plug-ins in several separate processes (some can, often called a “sandbox”), the Harmonias in the other processes find the new licence within about 6 minutes, or at once when you restart the DAW.
14.3 Three computers per licence
One licence code works on up to 3 computers. A bought code is activated online, once on each computer: the plug-in sends the code and that computer’s ID (the Machine ID shown in the key panel) to arswerk.it, which counts the computer. Without an internet connection a bought code cannot be activated: nothing is stored, and ACTIVATE tries again.
To use a fourth computer, first remove one in your account (arswerk.it/en/account, “Computers using this code”).
After that Harmonia needs no connection to work: the licence is checked on your computer. A trial key is checked on your computer and sends nothing. A licence activated with version 1.0.5 or older is registered the same way, by itself, the next time the plug-in loads with a connection.
14.4 What goes online
Besides activating a bought code (yours, or one activated with version 1.0.5 or older, which registers itself once: see above), Harmonia makes two requests, and it works without them:
- About 2.5 seconds after its window opens, it asks arswerk.it for the newest version number (a newer one shows the update notice).
- When you open Other products, it fetches that list.
Both are plain requests for a public file, and the plug-in adds nothing to them: no licence code, no Machine ID, nothing about your session. Like any web request, they show the server your IP address and your system’s standard request headers, the labels every web request carries (on macOS: the name and version of the program the plug-in runs in, the system’s version and your languages).
On Linux, activating a bought code, the update check and the Other products list all need libcurl (libcurl4 on Debian, Ubuntu and Mint). Without it the plug-in still runs and a trial key still activates, but a bought code cannot be activated (the key panel says that libcurl is missing) and you are not told about new versions.
15 Updating from 1.1.2
Install 1.1.3 in every format you use (VST3, AU, CLAP), then restart your DAW, or reload every Harmonia, so that every track runs 1.1.3.
Get it from your account (arswerk.it/en/account: each code has its download buttons) or with the update notice’s Download, then copy the files as in Copy the files.
Why: a Harmonia 1.1.3 and a 1.1.2 do not see each other. In a session where both run, each version’s tracks form their own ecosystem, and YIELD, PUMP keys, LEAD, groups, the low-end alignment, the strip, TRACKS, HEARD, the STAGE, MONO and PLAYBACK reach only tracks of the same version. Until every track runs 1.1.3, a YIELD set you picked by hand, the PUMP keys you chose, an eye you switched off or a low-end alignment key may point at another track: check them after updating.
Your projects. A session saved with 1.1.2 opens in 1.1.3 with all its parameters as saved, and a session saved with 1.1.3 opens in 1.1.2. The parameter list is the same (539 parameters, the same IDs), so automation carries over.
What sounds different. A session sounds as it did unless it uses one of these features, which 1.1.3 repaired:
- PUMP ducks the same at every audio buffer size. At a buffer larger than 64 samples at 44.1 or 48 kHz (128 at 88.2 or 96 kHz, 256 at 176.4 or 192 kHz), a track pumps deeper than it did: on our test kicks at 44.1 kHz the median duck is 2.25 dB deeper at 512 samples and 6.75 dB deeper at 2048. If it pumps too much, turn PUMP down.
- A pumping track is let go when its key track stops being processed (some DAWs stop a muted or stopped track); 1.1.2 kept it down.
- Linear phase: a band placed on Mid, Side, Left or Right works only there (1.1.2 applied it to the whole stereo signal); a dynamic band moves the same at every buffer, starting about 10 ms before the sound; and when the DAW changes the sample rate, the bands stay where they are set.
- A dynamic band has 48 kHz’s timing at every sample rate: at 44.1 kHz its move is 8 % shorter than in 1.1.2, at 88.2 and 96 kHz twice as long, at 176.4 and 192 kHz four times as long.
- A band keyed from the sidechain, with the analysis window in the path, now ducks with its key, to within 8 ms.
- An offline bounce made right after opening a session lines up with the track, in a DAW that asks for the latency before playing.
- Low-end alignment searches every 2 s of audio as it is processed (1.1.2 counted clock time), so a fast offline bounce gets the correction too, 2 s in; and the correction stays when the DAW prepares the plug-in again (some do at each start of playback).
- Grouped tracks whose YIELD sets or roles had drifted apart end with one set and one role when the project reopens.
- With a band in LISTEN, the DAW’s bypass and HEAR’s right-click bypass bring the dry track back.
Nine factory presets store new values (CHARACTER at 0, or 0.3 in Mix - Warm Master; Guitar - Shimmer also without REIN), and three have new names: Synth - Make Room (Yield), Utility - Rumble Filter and Utility - Soften Esses. A session saved with one of the nine keeps its own sound, and its preset box reads Custom; loading the preset again gives the new sound.
16 Known limitations
What 1.1.3 does not do, or does with a catch. Most of these come straight from its release notes.
The ecosystem
- What a project saves of the ecosystem is by place, not by track. The YIELD set you picked by hand, the PUMP keys, the eyes on the display and the low-end alignment key are saved by each Harmonia’s place in the session, which is the order in which your DAW creates them. A project from which a Harmonia was removed, or whose DAW loads its plug-ins in another order, can reopen with one of these on another track: check them when you reopen it. Tracks left on YIELD → ALL and on automatic PUMP keys are not affected.
- A DAW that destroys and re-creates a plug-in (some do on freeze, on a device switched off and on, or on a sample-rate change) takes that track out of the other tracks’ hand-picked YIELD sets and PUMP keys, and its eye on their displays comes back on.
- A 33rd Harmonia says the session is full, and does not join by itself when a place frees up.
- Harmonias in different processes finding each other (when your DAW runs plug-ins in separate processes, for example in a sandbox) was measured on macOS with test programs, with the AU, the CLAP and the VST3, not inside a DAW; on Linux it is checked by a two-process test; nothing has run two processes on Windows. In Logic Pro, Harmonia recognises Logic’s AU hosting processes so that they share one bus; this has not been confirmed inside Logic yet.
- HEARD has not been checked against a listener. It models only the tracks that run Harmonia, at the level each one leaves Harmonia, and tracks that are mostly below 250 Hz are not rated. Use it as a hint and trust your ears.
- PUMP: if your DAW processes the pumping track before its key, the duck comes one buffer late. A held buzzy sound on a key track keeps the duck down for as long as it sounds, and a bright bass that has a Harmonia counts as a key by default: choose the kick as the key yourself.
The bands and the display
- Linear phase sets one gain per frequency step of the analysis (the steps are 23.4 Hz apart at 48 kHz), so a band narrower than a few steps gets less than its setting: a −12 dB bell at 60 Hz with Q 8 delivers −1.45 dB, a notch at 1 kHz with Q 12 −12.21 dB. The curve shows what is delivered; the node stays at its setting. A dynamic band’s move begins about 10 ms before the sound.
- A dynamic band acts at the start of a rise and is back within about 0.12 s while the level stays up. The REL knob reads up to 1000 ms, but after a short flare the band itself comes back within 10 to 100 ms whatever it reads; a long REL mostly makes it ignore the flares that follow (see Make a band react to the music). The first sound after a dynamic band is switched on, or after the plug-in is loaded, is taken as a rise and gets the band’s full move for about a tenth of a second.
- Only bands 1 to 8 can be automated by your DAW.
- A band in LISTEN stays in LISTEN with the window closed and in an offline bounce (the bounce is of the band alone). The audition can be much louder than the track: see Listen to one band.
- The masking field is the model’s masked threshold: on a vocal, 51 to 92 % of the columns on screen still lie under its edge. With the display on Side, Left or Right it is still the Mid channel’s threshold.
- The brickwall filters need the analysis window (one window of latency, unless it is in the path already) and are not clean walls: just inside the range they keep, noise loses about 5 dB some 50 to 80 Hz from the corner, and a steady tone up to 9 dB. HP 40 Hz has little below it to remove.
Latency, bouncing and presets
- With LAT off, switching a spectral layer on or off (YIELD included, and so the session’s MONO, which switches YIELD on) interrupts the sound (the first time it goes silent for one window; after that it jumps by one window, a click on most material) and tells your DAW a new latency each time. With LAT on, the window’s delay is there from the start.
- In your DAW’s automation list, TRACKING is called “Tracking (zero latency)”, but it is not quite zero: it takes out the analysis window’s delay, and a low-end alignment key’s 5 ms remains, and CHARACTER’s 4 samples while CHARACTER is above zero.
- HEAR is recorded by any bounce your DAW does not report as offline, realtime bounces included: switch it off before you bounce.
- The A/B loudness match is not saved with the project, and it uses what A did to the level the last time you listened to A.
- A factory preset leaves LAT and TRACKING as they are; while TRACKING is on, a preset’s REIN works through the zero-latency notches and the YIELD of the two (Yield) presets stays held down. A factory preset also switches linear phase off. With LAT off, if the preset switches on nothing that needs the analysis window, the window then leaves the audio path: the latency changes and the sound jumps once, as when a layer is switched off.
Left as they were
- With CHARACTER up, a +12 dB band boost lowers the whole track by 1.2 to 2.5 dB.
- On HP and LP 24, 36 and 48, the Q knob does nothing above about 1.8.
- Alt-click and Delete Band switch a band off and keep its settings.
- SURFACE is not smooth at 40 %: a vocal comes out 0.3 to 0.4 dB louder at 40 % than at 41 %.
- Above 25 %, CLEAN takes next to nothing more off a full track (only a single isolated peak is cut deeper).
- GLOW lifts the hiss in a pause, where the hiss is the loudest thing left.
- The STAGE marks the LEAD with a small diamond, where the hover texts say .
Formats and testing
- MIDI learn exists in the CLAP only. In the CLAP, your DAW’s own bypass does not reach the plug-in: the DAW bypasses on its own. The plug-in’s bypass (right-click HEAR) works in every format.
- MIDI learn was tested on the plug-in’s processor, not with a controller in a DAW.
- The CLAP is built from the same code as the VST3 and the AU and is not run through a validator.
- The Intel half of the macOS build was run under Rosetta 2 on Apple Silicon, not on an Intel Mac.
- On Windows, the window’s opening size on a scaled display (125 %, 150 %) was checked by simulating displays only, not on a Windows machine.
- On Linux, the key panel’s message when libcurl is missing was checked on macOS with libcurl hidden, not on a Linux machine.
- The CPU cost of the work this version adds to the audio processing was not measured.
- When this manual names a DAW (the format it loads, its rescan steps, FL Studio’s favourites, Logic’s AU hosting), it does not say that 1.1.3 was tried in it.
17 Troubleshooting and questions
17.1 My DAW does not see Harmonia
- Check that
Harmonia EQ.vst3,Harmonia EQ.component(macOS) andHarmonia EQ.clapthemselves sit in the plug-in folders of Copy the files, not still inside the zip’s VST3, AU and CLAP folders. - Rescan, or fully quit and reopen the DAW.
- Windows: some DAWs keep their own extra VST3 folder: check the scan paths in your DAW’s preferences, and copy the .vst3 there as well if needed. If it is still not found, Windows may have marked the download as blocked: right-click the downloaded zip, choose Properties, tick Unblock, press Apply, then extract it again and copy the plug-in again. (This step has not been tried on Windows with this version.)
- Linux: Harmonia needs glibc 2.35 or newer; check yours with
ldd --version. Some distributions also scan the system-wide folders /usr/lib/vst3 and /usr/lib/clap, but the per-user folders are all you need. - macOS: Harmonia is signed with an Apple Developer ID and notarized by Apple, so macOS should load it without any extra step. If macOS still says it is blocked because it was downloaded from the internet, clear that mark in Terminal. Paste only the lines for the formats you installed, with their quotation marks (the name contains a space), then rescan:
xattr -dr com.apple.quarantine "$HOME/Library/Audio/Plug-Ins/VST3/Harmonia EQ.vst3"
xattr -dr com.apple.quarantine "$HOME/Library/Audio/Plug-Ins/Components/Harmonia EQ.component"
xattr -dr com.apple.quarantine "$HOME/Library/Audio/Plug-Ins/CLAP/Harmonia EQ.clap"
17.2 FL Studio (Windows)
After a scan, FL Studio lists new plug-ins in its Browser (Plugin database > Installed > Effects > New), but its “Add” and plug-in picker menus only show the plug-ins you have marked as favourites. After Options > Manage plug-ins > “Find installed plug-ins”:
- Look for Harmonia EQ in the plug-in list on the right.
- Click the star or tick next to it to mark it as a favourite.
- Only then does it appear in the “Add” and plug-in picker menus.
If Harmonia EQ does not even appear in that list, check that the Harmonia EQ.vst3 folder is in C:\ itself, and scan again. FL Studio finds VST3 plug-ins only in the standard VST3 folders; its “Plugin search paths” are for old VST1 and VST2 plug-ins. FL Studio supports CLAP only from FL Studio 2024 onward: on older versions, use the VST3.
17.3 Harmonia does not change the sound
- No key yet, or the key panel says your code was refused: until a key is activated, Harmonia passes the sound through unprocessed. See Activate.
- The trial has ended: the strip at the top says so. See Trial.
- HEAR reads BYP: the track is bypassed. Click it.
- A red LISTENING TO BAND banner: a band is in LISTEN. Right-click its node, Stop listening.
- MIX is at 0 %: you hear the dry track; only PUMP, the STAGE’s panning, the ceiling and HEAR still act on it.
- Nothing is turned up: a new Harmonia starts with every band off and every amount knob at zero.
17.4 YIELD does nothing
- Is YIELD above 0?
- Is there another Harmonia? The button under YIELD reads NO OTHER TRACKS otherwise.
- Does the button read YIELD → NOBODY? Click it, or click a chip.
- Does the other track play in the same frequencies, as loud or louder? YIELD cuts only where the other track has energy, and very little where it is quieter than this one.
- Is TRACKING on? It holds YIELD down. Is MIX at 0 %?
- Click YIELD VIEW: its middle line says why YIELD is not cutting.
- Are all your Harmonias the same version? A 1.1.2 and a 1.1.3 do not see each other: see Updating from 1.1.2.
17.5 PUMP does nothing, or pumps on the wrong track
- PUMP must be above 0, and the key needs its own Harmonia.
- By default PUMP follows every other Harmonia with plenty of low end: often a bass too, at times other tracks. Choose the key yourself: right-click the kick’s chip, Pump from (sidechain key).
- A held buzzy bass keeps the duck down: choose the kick as the key.
- Some DAWs stop processing a muted or stopped track: its key then stops counting, and the pumping track is let go.
17.6 The strip is empty, or says LOCAL ONLY
- Empty strip: no other Harmonia of the same version is reachable. Put Harmonia on another track, and install the same version in every format you use.
- LOCAL ONLY: the shared bus could not be opened. This copy can reach only Harmonias of the same format (all VST3, all CLAP or all AU) that the DAW runs in the same process as this one.
- SESSION FULL or JOIN ECOSYSTEM: 32 Harmonias are on the bus, or this one was ejected. See How the copies find each other.
17.7 The sound jumps or clicks when I switch something on
With LAT off, switching a spectral layer on or off changes the latency, and the sound drops out or jumps. YIELD is one of those layers, and the session’s MONO switches YIELD on in every Harmonia on the bus. Click LAT to keep the latency constant: see LAT.
17.8 Too much delay while I record
Right-click LAT and choose Tracking: the analysis window leaves the audio path, whatever is on. If REIN is the only spectral layer you use and LAT is off, REIN’s zero-latency mode (in REIN’s menu) is enough. See TRACKING.
17.9 My bounce does not sound like playback
- HEAR was on during a realtime bounce: it records what HEAR plays.
- A band was in LISTEN: the bounce is of that band alone.
- The A/B loudness match is never in an offline render.
- A new project with a low-end alignment key gets its correction 2 s in.
17.10 After reopening, YIELD or PUMP points at another track
Hand-picked YIELD sets, PUMP keys, eyes and alignment keys are saved by place in the session: see Known limitations. Check them, and pick again where needed.
17.11 How do I move my licence to a new computer?
On the new computer, with an internet connection, paste your code into the key panel and press ACTIVATE. A code works on up to 3 computers: if it is already on 3, first remove the one you no longer use in your account (arswerk.it/en/account, “Computers using this code”). See Three computers per licence.
17.12 Do I need an internet connection?
Only to activate a bought code, once on each computer. After that the licence is checked on your computer, and a trial key never needs a connection. The update check and the Other products list go online, but Harmonia works without them.
18 Uninstall and support
18.1 Uninstall
Delete the plug-in files from the folders of Copy the files: Harmonia EQ.vst3, Harmonia EQ.component (macOS) and Harmonia EQ.clap. On Windows and Linux, Harmonia EQ.vst3 is a folder: delete the whole folder.
You can also delete what Harmonia keeps for you: your presets and favourites (a folder), your licence (a file), and the Other products list it last fetched (a folder). Delete only these three: the folders around them are shared, and other Arswerk plug-ins keep their presets and licences there. Harmonia also keeps a small record of the trial on this computer, so that a trial is not given twice; it stays when you uninstall.
macOS
~/Library/ Arswerk/ Harmonia ~/Library/ Application Support/ Arswerk/ Licenses/ HARMONIA.arslicense ~/Library/ Application Support/ Arswerk/ Harmonia EQ
Windows
%APPDATA%\Arswerk\ Harmonia %APPDATA%\Arswerk\ Licenses\ HARMONIA.arslicense %APPDATA%\Arswerk\ Harmonia EQ
Linux
~/.config/ Arswerk/ Harmonia ~/.config/ Arswerk/ Licenses/ HARMONIA.arslicense ~/.config/ Arswerk/ Harmonia EQ
To free this computer’s place on your licence code, remove it under “Computers using this code” in your account (arswerk.it/en/account).
18.2 Support
Need a hand? Write to info@arswerk.it. The product page is arswerk.it/en/vst/harmonia.
19 Glossary
- A/B: two snapshots of the plug-in that you flip between to compare. See A/B.
- All pass: a filter that shifts phase without changing level.
- Analysis window: the short stretch of sound Harmonia’s spectral engine looks at (2048 samples at 44.1 or 48 kHz). While it is in the audio path, the sound comes out that much later. See Latency.
- AU, VST3, CLAP: plug-in formats. AU (Audio Unit) is Apple’s and exists on macOS only; VST3 is loaded by most DAWs; CLAP is a newer open format.
- Band: one filter of the EQ, shown as a numbered node on the display.
- Bin (frequency step): one of the narrow frequency slices the spectral engine works on: 23.4 Hz wide at 48 kHz.
- Bounce, render: exporting the mix to a file. An offline bounce is not played in real time: the DAW renders it as fast as the computer can.
- Brickwall filter: a very steep filter that cuts almost everything past its corner.
- Bus (shared bus): the shared memory through which the Harmonias of a session see each other. See How the copies find each other.
- Chip: the small tile of another Harmonia in the ecosystem strip.
- Correlation: how alike the left and right channels are: +1 is mono, −1 is inverted.
- DAW: the music program you record and mix in.
- dB: decibel, the unit for differences in level.
- dBFS: level against digital full scale; 0 dBFS is the top.
- dBTP: true peak, the highest point between samples once the sound is turned back into a curve.
- dB SPL: how loud a sound is in the room.
- Ducking: turning a sound down for a moment because another one plays.
- Dynamic band: a band that moves by itself when the sound changes. See dynamics.
- Ecosystem: all the Harmonias that see each other on the shared bus. See How the copies find each other.
- Instance: one copy of a plug-in, on one track.
- Key (licence code, trial key): the long code from your email, starting with
ARSWERKV1, that you paste into the key panel. Not the same as the PUMP key. - Key (PUMP): the track whose hits make another one duck. See PUMP.
- Latency: a delay added by processing; while you mix, your DAW makes up for it. See Latency.
- Linear phase, minimum phase: two ways to build an EQ band. Minimum phase (the usual way) shifts timing a little and adds no latency; linear phase shifts none, costs latency and can pre-ring. See Linear phase.
- LUFS, LU: loudness units. LUFS measures loudness; LU is a difference in loudness.
- Masking: a loud sound making quieter sounds near it in frequency harder to hear.
- Mid, Side: the centre of a stereo image (what both speakers share) and its edges (what differs between them). See placement.
- Mono: one channel. A mono system plays left and right summed together.
- Node: the numbered dot of a band on the display.
- Pre-ringing: ringing that a linear-phase filter adds before a sharp sound.
- Process: a running program. A DAW runs its plug-ins inside its own process or, when it is set to, in separate processes (a “sandbox”). Two DAWs open at once are two processes.
- Q: the width of a band: low Q is broad, high Q is narrow.
- Resonance: a narrow frequency that rings out longer or louder than the rest of the sound.
- Salience: Harmonia’s own judgement of importance: how loud a track is, times how alive it is. See LEAD.
- Sample rate, buffer: how many samples per second your DAW uses (44.1 kHz, 48 kHz…), and how many it hands to a plug-in at a time.
- Shelf: a filter that raises or lowers everything below (low shelf) or above (high shelf) a corner.
- Sidechain: a signal from one track that controls a process on another.
- Spectral layer: REIN, CLEAN, SURFACE, GLOW, SCULPT or YIELD: processing in Harmonia’s spectral engine, frequency slice by frequency slice.
- Spectrum: how much energy a sound has at each frequency.
20 About this manual
This is the manual of Harmonia EQ 1.1.3, released on 14 October 2026; the manual is of October 2026. Harmonia EQ is made by Arswerk, a brand of Zampaw S.R.L.S.
It is written from the plug-in’s own code and texts, from its product page on arswerk.it, and from Arswerk’s own measurements and checks of the plug-in. Every number about what Harmonia does is either one of its settings or a measurement quoted from those sources. Questions and corrections: info@arswerk.it.
Set in Cinzel, EB Garamond and JetBrains Mono, under the SIL Open Font License 1.1.
Version 1.1.3 · released 14 October 2026 · Manual of October 2026. The whole manual as a PDF (52 pages · 3.8 MB). Harmonia EQ by Arswerk.